
How to Make Homemade Fruit Vinegar - Apple, Quince & More
How to Make Homemade Fruit Vinegar - Apple, Quince & More
It's autumn in New Zealand, the fruit trees are going absolutely WILD, and if you've already made enough stewed apple and pies to feed a small country, this one is for you. We are making HOMEMADE VINEGAR, and honestly, it might just be one of the most satisfying things you'll ever do in your kitchen. Fallen fruit, soft fruit, fruit you'd otherwise chuck all of it can be transformed into something genuinely incredible that you'll be pulling out of the cupboard all year long. A good apple cider vinegar at the supermarket? Easily $12 or more. This? Costs you practically nothing and you can make ANY flavour you like!
Watch me make part one - how to start your fruit vinegar - here!
Recipe Details:
- Prep Time: 15 minutes
- Fermentation Time: 4 weeks (2 weeks with fruit + 2 weeks without)
- Total Time: Approximately 4 weeks hands-off
- Makes: Approximately 1 jar per fruit variety
- Difficulty: Easy
- Special Equipment: Large clean jars with wide mouths, paper towel and rubber bands, fine mesh strainer or muslin cloth, chopstick or long spoon, airtight bottles for finished vinegar
This is a two-stage fermentation process, and understanding the science makes it SO much easier to trust. Stage one: the natural yeasts on your fruit skins get to work on the sugar, producing alcohol, essentially you're making a rough fruit wine. Stage two: once the fruit is strained out, a different type of bacteria (acetobacter) takes over and converts that alcohol into acetic acid, and that's your vinegar! The whole thing is wild fermentation, meaning you don't need to add anything special. Nature does the heavy lifting. Your job is just to stir it every day and be patient.
Why You'll Love This Recipe
- Zero waste hero: Uses fallen fruit, soft fruit, and scraps that would otherwise be binned
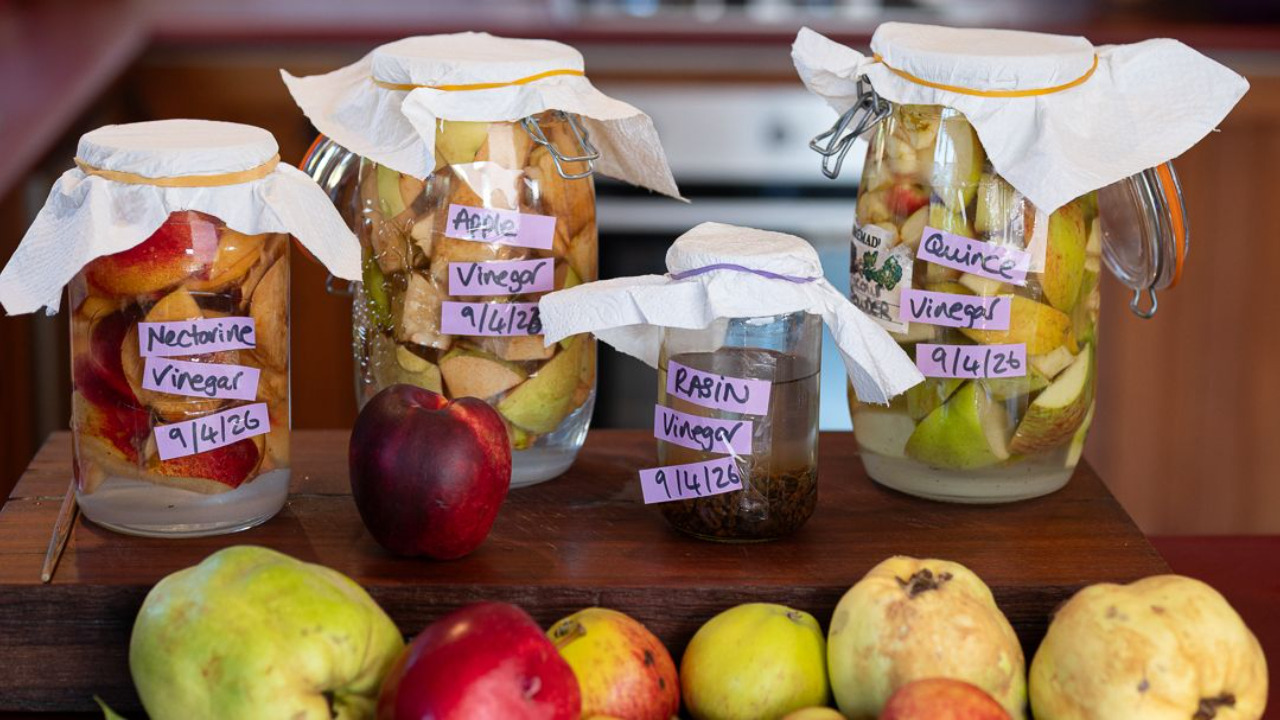
- Make any flavour: Apple, quince, nectarine, pear, raisin, if it's got sugar in it, you can vinegar it
- Practically free: Fruit from your garden or a neighbour's tree + sugar + water
- Incredibly satisfying: Watching something transform over weeks is genuinely exciting
- Useful all year: Homemade vinegar for dressings, chutneys, marinades, and more
Ingredients
Per Jar:
- Enough fruit to fill your jar about ¾ full (apples, quinces, nectarines, pears, or similar)
- ⅓ cup (approximately 65g) sugar
- Enough water to cover the fruit completely
For Dried Fruit (e.g. raisins):
- Enough raisins to fill your jar about ¾ full
- Water to cover, no extra sugar needed (dried fruit is already very high in sugar)
Instructions
1. Wash your fruit: Give everything a good rinse to remove any dirt or nasties from the outside. Don't scrub, you want to keep those natural yeasts on the skins intact. They're your friends here!
2. Chop and fill your jars: Roughly chop the fruit into chunks, no need to be neat about it. Fill each clean jar about ¾ full with the chopped fruit.
3. Add sugar and water: Add ⅓ cup of sugar to each jar. Pour over enough water to completely submerge all the fruit, leaving a couple of centimetres of headspace at the top, the mixture will bubble and expand as it ferments! Stir well with a chopstick until the sugar dissolves.
4. Cover and store: Cover the top of each jar loosely with a piece of paper towel secured with a rubber band. You want air to be able to move in and out (this is an aerobic fermentation) but you don't want dust, flies, or anything else falling in. Do NOT seal with a lid.
5. Ferment for 2 weeks, stirring daily: Store the jars in a cupboard at room temperature. Each day, give the contents a good stir with your chopstick, pushing any fruit that's poking up above the liquid back down under the surface. Within a day or two you should start to see bubbles, that's fermentation happening and it is VERY exciting! After about a week you'll notice a distinct cidery, boozy smell, that's your fruit turning into alcohol. Perfect.
6. Check in at one week: At the one-week mark, take a peek. You may see some surface mould on top of the fruit, don't panic! Because the liquid is becoming increasingly acidic, it should take care of itself as it progresses. Skim off anything obvious and keep going. The liquid itself should smell yeasty and fruity.
7. Strain out the fruit at 2 weeks: After 2 weeks, strain the liquid through a fine mesh strainer or muslin cloth into a clean jar or vessel. Squeeze or press the fruit to get all the liquid out, then discard or compost the pulp. The liquid at this stage will be cloudy, slightly fizzy, and smell alcoholic, that's exactly right.
8. Second ferment — 2 more weeks without the fruit: Cover the strained liquid with a fresh piece of paper towel and rubber band (still no sealed lid, it needs to breathe!). Return to the cupboard for another 2 weeks. During this stage, the alcohol will slowly convert to acetic acid and your vinegar will develop. You'll notice the smell shifting from boozy to tangy and acidic over time.
9. Taste and decide: From about week 3 onwards, start tasting your vinegar every few days. It will become more acidic as time goes on. When it tastes right to you, pleasantly sharp and vinegary, it's done! If you want it more acidic, simply leave it a bit longer.
10. Bottle and seal: Once you're happy with the flavour, pour the finished vinegar through a fine strainer into clean bottles and seal with proper lids. Store in a cool dark place. It will continue to mellow and improve over time.
Chef's Tips
Chlorinated tap water: If you're in a NZ town or city, your tap water will likely be chlorinated. Leave it in an open jug for 30 minutes before using, chlorine evaporates and it won't inhibit your fermentation. This is the same principle as making sourdough starter!
Don't fill jars to the top: Leave proper headspace. The mixture will bubble and expand, especially in the first week, and you do NOT want it overflowing in your cupboard!
Daily stirring is important: Pushing the fruit back under the liquid each day helps prevent mould and keeps everything evenly fermenting. Your chopstick becomes your best friend!
Dried fruit needs no extra sugar: Raisins, dates, dried apricots, they're already concentrated with sugar, so skip the added ⅓ cup. The fermentation will still go beautifully.
Trust the smell: Your nose is your best tool here. Alcoholic and cidery after week one = great. Tangy and sharp after week three = vinegar is developing. Rotten or putrid = something's gone wrong.
How to tell if it's safe: When you check your vinegar, you are looking for two things - smell and sight. Good signs: vinegary, fruity, tangy, or acidic smells, sediment at the bottom, cloudy liquid, stringy bits, or a jelly layer on top. These are all completely normal. Bad signs: anything that smells mouldy, cheesy, rotten, or putrid - and visually, any fluffy, black, red, or orange growth on the surface. If you see any of those, chuck it out and start again. The cost to you is a bit of fruit and sugar, so don't risk it.
Container size affects speed: A wider opening means more surface area exposed to air, which speeds up the conversion from alcohol to vinegar. If your vinegar seems to be taking much longer than expected, try transferring it into a wider jar and covering it back up with paper towel. A narrow-necked bottle will slow the whole process right down.
Dried fruit gets there faster: If you've ever dehydrated fruit and are not sure what to do with it, vinegar is the answer. The concentrated sugars in dried fruit mean fermentation moves much faster than with fresh fruit, and the flavour is incredible. Raisins in particular are a revelation.
The process takes as long as it takes: The 4-week timeline is a guide, not a guarantee. Some batches are done by week 5, some need week 8 or even 9, especially if your kitchen is cool or your jar is narrow. Taste it regularly from week 3 onwards and trust your palate. When it's sharp and acidic enough for you, it's done. When it's done, seal the lid tight to stop the fermentation continuing.
The quince is slower: Quince is lower in sugar than apple or nectarine, so expect fermentation to move a little more slowly. It'll get there, just may need an extra few days.
Label your jars: Obvious when you start, not so obvious four weeks later! Pop a date and fruit type on each jar.
Substitutions & Variations
Any seasonal fruit works: Pears, plums, feijoas, berries, peaches, if it grows, you can vinegar it.
Tropical fruits: Mango, pineapple, and papaya all work brilliantly if you're in a warmer climate.
Dried fruit vinegar: A raisin vinegar is rich and slightly sweet-tangy, fantastic in salad dressings.
Apple scraps vinegar: Cores and peels from apple peeling sessions work just as well as whole fruit, true zero waste!
Mix your fruits: Throw a few different fruits together in one jar for a blended vinegar, apple and quince is particularly lovely.
Storage
Finished vinegar: Store sealed in clean glass bottles in a cool, dark cupboard. It will keep for at least a year, often longer. The flavour will continue to mellow and deepen over time.
Sediment is normal: You may notice a cloudy sediment or a jelly-like blob forming in your finished vinegar, that's called the "mother" and it's a sign of a live, healthy vinegar. It's completely harmless and actually brilliant for starting your next batch!
Ongoing fermentation: If your bottles aren't fully sealed or are stored at room temperature, fermentation may continue slowly. This just means your vinegar will get more acidic over time, not a problem, just something to be aware of.
Frequently Asked Questions
Q: Do I need any special equipment? A: Not at all! Clean jars, paper towel, a rubber band, a chopstick, and patience. That's genuinely it.
Q: What if I see mould? A: Surface mould on the fruit during the first two weeks is common and generally okay, skim it off and keep going. The increasing acidity of the liquid should deal with most of it. If you see heavy mould throughout the liquid itself or it smells truly rotten, discard and start again.
Q: Can I use fruit that's a bit soft or bruised? A: Yes! That's literally the point. Fruit that's too soft to eat nicely is PERFECT for vinegar. Just cut away anything that's actually rotted.
Q: How do I know when it's finished? A: Taste it! When it's pleasantly sharp and acidic, like a mild apple cider vinegar, it's done. You get to decide how acidic you want it.
Q:What is that jellyfish-like jelly thing floating in my vinegar? That is the mother of vinegar, and it is a very good sign! It forms naturally during fermentation and looks like a wobbly, slightly alien jelly disc, sometimes thick and round, sometimes more stringy and wispy depending on the fruit. Think of it exactly like the scoby you get when making kombucha. It is a colony of beneficial bacteria that is doing all the work of converting your alcohol to vinegar. It is completely safe, completely normal, and actually GOLD for your next batch, keep it and add it to your next jar of fruit and sugar water and it will kickstart fermentation much faster than starting from scratch. When you strain your finished vinegar, scoop the mother out and pop it into the bottom of your storage jar.
Q: Can I speed up the process? A: Not really, no, the bacteria work at their own pace. Warmer temperatures will speed things up slightly, and a cooler kitchen will slow things down. Just roll with it!
Q: What can I use the vinegar for? A: Salad dressings, marinades, chutneys, pickling vegetables, deglazing pans, homemade shrubs and drinks, it's incredibly versatile.
You Might Also Like
Fruit Cheong (Korean Fermented Syrup) - Plum & Apple Recipe - Another brilliant way to preserve seasonal fruit abundance!
Beginner's Guide to Lacto Fermentation - 2 Easy Methods - Once you're hooked on fermentation, this is your next adventure.
Plum Kasundi - Indian Spiced Fruit Condiment Recipe - Another delicious way to use up an abundance of seasonal fruit!
Enjoy!
Del x
Homemade fruit vinegar is one of the most satisfying things you can make, fallen apples, soft nectarines, even a handful of raisins transformed into something genuinely delicious that'll sit in your cupboard all year. Two weeks with the fruit, two weeks without, a daily stir, and you're done. Don't bin that fruit, vinegar it!
Join the Dishes with Del community.
Stay in the loop with new recipes, exciting announcements, anything to keep you away from the washing up!
No spam here. Just tasty recipes!

