
Beginner's Guide to Lacto Fermentation - 2 Easy Methods
Beginner's Guide to Lacto Fermentation - 2 Easy Methods
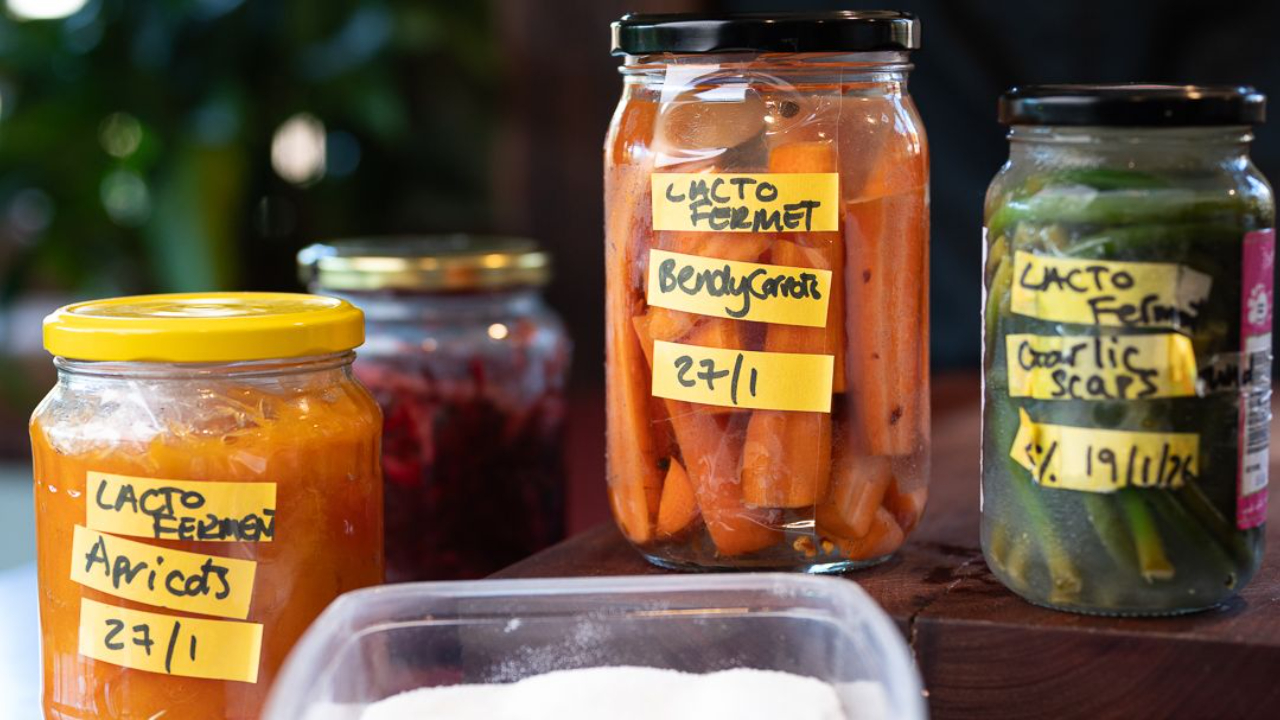
Are you interested in lacto fermentation but scared and don't know where to begin? You've landed in the RIGHT place! Lacto fermentation is a tale as old as time - a brilliant way to preserve vegetables and fruit, make them last longer, and they're GOOD for your belly too! There are TWO super easy methods - the dry salt method (like sauerkraut) and the salt brine method. You only need vegetables or fruit and salt - that's it! Whether you've got sad bendy carrots, soft apricots, or garden abundance, let's turn them into delicious fermented goodness!
Guide Details:
- Methods Covered: 2 (dry salt and brine)
- Time: 5-20 minutes prep, 1-3 weeks fermenting
- Difficulty: Beginner-Friendly
- Special Equipment: Glass jars, salt, vegetables or fruit
- Perfect For: Zero waste, preservation, gut health
So, what is lacto fermentation? If you've ever eaten sauerkraut or kimchi, you've had lacto fermented foods! Lacto fermentation is the natural process where, by using salt, you encourage the GOOD bacteria to grow while stopping all the bad stuff. That's what the salt does. And then those good bacteria create acidity and tang, all while preserving the food you've put in. Fermenting has been done for CENTURIES in all different parts of the world. It's a great way to preserve things, make them last longer, and honestly, it's SO much better for you than regular pickling because you're creating beneficial probiotics that are brilliant for your gut health. What I LOVE about lacto fermentation is it's a fantastic way to use up things that might be going to waste or looking a bit sad and floppy. Got bendy carrots? Perfect! Soft apricots? Ideal! Too many cucumbers from the garden? Ferment them! You don't need any special equipment or fancy ingredients - just vegetables or fruit, salt, and a jar.
Why You'll Love Lacto Fermentation
- Preserves food naturally: Makes things last for MONTHS without refrigeration initially
- Zero waste hero: Uses up sad, bendy, or abundant vegetables and fruit
- Good for your gut: Creates beneficial probiotics that support digestive health
- Only needs salt: No special ingredients, equipment, or skills required
- Incredibly versatile: Ferment anything from fruit to vegetables to garlic!
- Amazing flavour: That tangy, complex taste you can't get any other way
What is Lacto Fermentation?
The Science Bit (Made Simple!):
Lacto fermentation uses salt to create an environment where good bacteria (lactobacillus) can thrive while bad bacteria can't survive. These good bacteria eat the natural sugars in your vegetables or fruit and produce lactic acid, which:
- Creates that tangy, sour flavour
- Preserves the food by making it acidic (bad bacteria can't grow in acidic environments)
- Adds beneficial probiotics that are brilliant for gut health
- Enhances and develops complex flavours
The "Lacto" doesn't mean dairy! It's called lacto fermentation because it produces lactic acid, NOT because it contains lactose or dairy. It's completely suitable for vegans and people who are lactose intolerant!
The Two Methods Explained
Method 1: Dry Salt Method (For Soft Ingredients)
Best for: Soft fruit (apricots, plums, berries), cabbage (sauerkraut), soft vegetables. If you'd rather preserve fruit without salt, try fruit cheong a Korean sugar-based method that turns any fruit into a gorgeous syrup that keeps for 6 months in the fridge.
How it works: You massage salt directly into the food, which draws out the moisture. That moisture becomes your brine!
Examples: Sauerkraut, fermented apricots, kimchi, fermented berries
Method 2: Salt Brine Method (For Hard Ingredients)
Best for: Hard vegetables (carrots, cucumbers, radishes, green beans), garlic scapes, whole vegetables
How it works: You make a saltwater solution (brine) and pour it over your prepared vegetables to completely cover them.
Examples: Fermented carrots, pickles (fermented cucumbers), fermented garlic scapes, fermented beans
The Essential 2% Salt Formula
This is THE most important thing to remember! You want a 2% salt solution for perfect fermentation.
The Formula: Weight of food (or food + water) × 0.02 = grams of salt needed
Method 1 (Dry Salt) Example:
- 620g apricots × 0.02 = 12.4g salt needed
Method 2 (Brine) Example:
- 650g (carrots + water) × 0.02 = 13g salt needed
Why 2%? This creates the perfect environment for good bacteria while preventing bad bacteria. You can go up to 3% if you like things saltier, but 2% is the sweet spot!
Method 1: Dry Salt Method - Fermented Apricots
What You'll Need:
- Soft apricots (or any soft fruit - about 600g)
- Salt (calculated using the 2% formula)
- Glass jar (large enough to fit your fruit)
- Chopstick or clean spoon
- Weight or compostable plastic wrap (to keep fruit submerged)
Instructions:
Step 1: Prep your fruit Remove any stalks, cut out any blemishes or bruises, and cut the apricots into quarters. You want pieces that are substantial enough to hold their shape but small enough to pack tightly.
Step 2: Calculate your salt Weigh your prepared fruit in a bowl. Let's say you have 620g. Multiply by 0.02: 620g × 0.02 = 12.4g salt needed. Round to 12g salt.
Step 3: Mix salt and fruit Add the calculated amount of salt to your fruit in the bowl. Gently mix everything together - the salt will start drawing out moisture immediately. Don't massage too hard (fruit is soft and bruises easily!), just mix well to distribute the salt.
Step 4: Let it sit Let the salted fruit sit for 5-10 minutes. You'll see moisture pooling at the bottom of the bowl and the fruit looking shiny and wet. This is PERFECT!
Step 5: Pack into jar Transfer the fruit and ALL the liquid into your clean glass jar. Pack it down REALLY firmly with your fist or the back of a spoon. You want to eliminate air pockets - air is the enemy! Keep packing and pushing down. Use a chopstick to release any air bubbles trapped at the bottom.
Step 6: Create a seal The fruit needs to be submerged under liquid with no air touching the surface. If you have a fermentation weight, use that. If not, place a clean cabbage leaf on top, or use compostable plastic wrap pressed directly onto the surface to create a seal. Wipe the rim of the jar clean with paper towel.
Step 7: Lid on loosely Put the lid on, but don't screw it super tight - just loosely. Gases will build up and need to escape!
Step 8: Ferment! Leave on the counter (out of direct sunlight) for 1-3 weeks depending on your climate and how tangy you like it. Every day, "burp" the jar by opening the lid to release gases. After about a week, taste it! Is it tangy enough? If yes, move to the fridge. If not, keep fermenting!
Method 2: Salt Brine Method - Fermented Carrots
What You'll Need:
- Bendy, sad, or fresh carrots (about 300-400g)
- Water (enough to cover carrots in jar)
- Salt (calculated using the 2% formula)
- Glass jar
- Optional: black peppercorns, chilli flakes, or other spices
Instructions:
Step 1: Weigh your empty jar IMPORTANT! Weigh your empty jar first and write it down. You'll need this number! Let's say it weighs 350g.
Step 2: Prep your carrots Wash the carrots, cut off the tops and any brown ends. Cut them into sticks roughly the same size so they ferment evenly. It's fine if they're bendy or a bit sad - perfect for fermentation!
Step 3: Pack carrots into jar Put your prepared carrots into the jar, packing them in quite tightly.
Step 4: Fill with water Pour water over the carrots until they're completely covered, right to the top of the jar. Put the jar on the scale.
Step 5: Calculate salt needed Let's say the jar now weighs 1,000g total. Subtract the empty jar weight: 1,000g - 350g = 650g (this is the weight of water + carrots). Now multiply by 0.02: 650g × 0.02 = 13g salt needed.
Step 6: Add salt and flavourings Pour out a bit of the water into a cup. Add your calculated salt to the water in the cup and stir to dissolve. Pour it back into the jar. If you want extra flavour, add a few black peppercorns, chilli flakes, or other spices now.
Step 7: Ensure everything is submerged The carrots must be completely underwater. If any are poking out, push them down or add more brine (water + 2% salt).
Step 8: Lid on loosely Put the lid on loosely - not tight! The jar needs to release gases.
Step 9: Ferment! Leave on the counter for 1-3 weeks. Every day, open the lid to "burp" it and release gases. You'll see the water go cloudy (this is GOOD - it means fermentation is happening!). After a week, taste a carrot. Tangy enough? Into the fridge! Not enough? Keep going!
Signs of Successful Fermentation
Good Signs (This is what you WANT to see):
- Cloudy liquid (this is the good bacteria working!)
- Bubbles rising to the surface
- Fizzy sound when you open the jar
- Tangy, sour smell (like vinegar or pickles)
- Vegetables or fruit becoming more translucent
- Slightly softer texture but still with bite
Bad Signs (Something's gone wrong):
- Mold on the surface (fuzzy, white, green, or black growth)
- Foul, rotten smell (not tangy - actually disgusting)
- Slimy, mushy texture (not just soft - actually slimy)
- Pink or orange discoloration (sign of wrong bacteria)
If you see bad signs, unfortunately it's gone wrong. Chuck it in the compost and try again!
Timeline and Temperature
Warmer Climate (Summer):
- Fermentation will be FAST - sometimes just 5-7 days
- Check daily and taste after 5 days
- Might be ready in just 1 week!
Colder Climate (Winter):
- Fermentation will be SLOW - might take 2-3 weeks
- Check daily but be patient
- Might need the full 3 weeks to develop flavour
How to Tell It's Done: The ONLY way to know is to taste it! After about a week, open the jar and try a piece. Is it tangy and sour enough for you? Yes = move to fridge. No = keep fermenting and check again in a few days.
Storage and Shelf Life
During Fermentation (On the Counter):
- Burp the jar daily to release gases
- Keep out of direct sunlight
- Check for signs of fermentation
- Ferment for 1-3 weeks depending on taste preference
After Fermentation (In the Fridge):
- Once it's tangy enough, move to the fridge
- The cold slows fermentation WAY down (almost stops it)
- NO need to burp anymore once refrigerated
- Keeps for 6-12 MONTHS in the fridge!
- The flavour continues developing slowly but won't get too sour
What Can You Ferment?
Vegetables (Brine Method):
- Carrots, cucumbers (make pickles!), radishes, green beans, cauliflower, broccoli stems, asparagus, garlic scapes, spring onions, peppers
Soft Vegetables (Dry Salt Method):
- Cabbage (sauerkraut!), courgettes, tomatoes
Fruit (Dry Salt Method):
- Apricots, plums, cherries, berries, grapes, peaches
Avoid Fermenting:
- Anything already moldy (can't save it with fermentation!)
- Very soft/mushy things that have gone too far
Chef's Tips for Success
Air is the enemy: Everything must be submerged under liquid with no air pockets. Use weights, plastic wrap, or cabbage leaves to keep everything under the brine.
Salt matters: Use pure salt without additives. Table salt with anti-caking agents or iodine can affect fermentation. Sea salt or kosher salt is perfect.
Clean but not sterile: Your jars should be clean but don't need to be sterilized. The good bacteria will outcompete anything else thanks to the salt!
Be patient: Every kitchen is different. Temperature affects speed. Don't rush it!
Trust your senses: If it smells tangy and sour = good! If it smells rotten = bad!
Burp daily: During active fermentation, open the lid once a day to release gases. Otherwise you might get a mini explosion!
Keep it cool: Don't ferment in direct sunlight or next to the oven. Room temperature in a cupboard or on the counter is perfect.
Start simple: Begin with one jar and one vegetable. Master the technique, then experiment!
Troubleshooting Common Problems
Q: My ferment isn't bubbling. Is it dead? A: Not necessarily! In cold weather, fermentation is very slow. Give it more time. As long as it doesn't smell bad, keep waiting.
Q: There's white film on top. Is that mold? A: Possibly kahm yeast (harmless but unpleasant) or actual mold (bad). If it's fuzzy = mold, chuck it. If it's a flat white film = kahm yeast, you can scrape it off or start again.
Q: My jar exploded! A: You didn't burp it enough! During active fermentation, gases build up. Open the lid once a day to release pressure.
Q: Everything floated to the top. A: You need a weight! Anything exposed to air can go moldy. Push everything back down and add a weight or plastic wrap seal.
Q: It's too salty. A: You might have used too much salt (recheck your math) or not enough water. Next time, double-check the 2% calculation.
Q: It's not sour enough. A: Keep fermenting! Give it more time. Taste every few days until it reaches your preferred tanginess.
Q: Can I open it to check? A: Yes! You SHOULD be opening it daily to burp it anyway. Checking and tasting is fine.
Using Your Fermented Foods
Fermented Carrots:
- Eat as a crunchy snack
- Chop and add to salads
- Serve alongside sandwiches
- Add to rice bowls or buddha bowls
Fermented Apricots:
- Eat as a tangy snack (amazing!)
- Chop and add to salads for sweetness
- Serve with cheese boards
- Use in baking or cooking (the tang is delicious!)
Fermented Garlic Scapes:
- Wonderfully garlicky and crunchy
- Chop and add to salads
- Use in stir-fries
- Add to pasta or grain dishes
Use the Brine Too! That liquid is PACKED with probiotics! Use it as:
- Salad dressing base
- Marinade for meats
- Starter liquid for your next ferment (speeds things up!)
- Shot of wellness (if you're brave!)
Frequently Asked Questions
Q: Is lacto fermentation safe? A: Yes! The salt creates an environment where only good bacteria can grow. Humans have been doing this for thousands of years. Trust your nose - if it smells bad, don't eat it. If it smells tangy, you're golden!
Q: Do I need a special jar? A: No! Any clean glass jar with a lid works. You don't need fancy fermentation crocks or airlocks (though they're nice if you have them).
Q: Can I use table salt? A: Best to avoid table salt with additives. Use pure sea salt, kosher salt, or any salt without anti-caking agents or iodine.
Q: Why is the liquid cloudy? A: That's the good bacteria at work! Cloudy liquid is a sign of successful fermentation. It should look cloudy, not clear.
Q: Do I have to burp it every single day? A: During active fermentation (first week or two), yes! After that it slows down. Once in the fridge, no burping needed.
Q: Can I ferment in plastic? A: Glass is best because it's non-reactive. Plastic can absorb flavours and isn't ideal for fermentation.
Q: How long before I can eat it? A: After about 5-7 days in warm weather, give it a taste! If it's tangy enough for you, it's ready. If not, keep going.
Q: Is lacto fermentation the same as pickling? A: No! Pickling uses vinegar. Lacto fermentation creates its own acid naturally through bacterial action. Fermented foods have beneficial probiotics that pickled foods don't have.
You Might Also Like
Beetroot Kvass - Easy Fermented Beetroot Drink - Another brilliant lacto fermentation project that's great for gut health!
Ginger Bug prefer sugar-based fermentation? A ginger bug is a living wild culture made with just 3 ingredients that makes naturally fizzy sodas. A brilliant next step once you've mastered lacto fermentation.
Homemade Healthy Seed Crackers - Perfect for serving alongside your fermented vegetables!
Zero Waste Cooking Tips - More brilliant ways to use up vegetables and reduce food waste! All on my YouTube channel.
Enjoy!
Del x
Lacto fermentation is SUCH a brilliant skill to learn! It's a tale as old as time - preserves food, reduces waste, creates amazing flavours, and it's brilliant for your gut health. Start with one jar, master the technique, and you'll never look back. Those sad bendy carrots? PERFECT for fermenting. Soft apricots? Ideal! You only need salt and vegetables or fruit - that's IT. Give it a go and let me know in the comments what you ferment first!
Join the Dishes with Del community.
Stay in the loop with new recipes, exciting announcements, anything to keep you away from the washing up!
No spam here. Just tasty recipes!

