
Traditional Rēwena Bread - Māori Bread Recipe
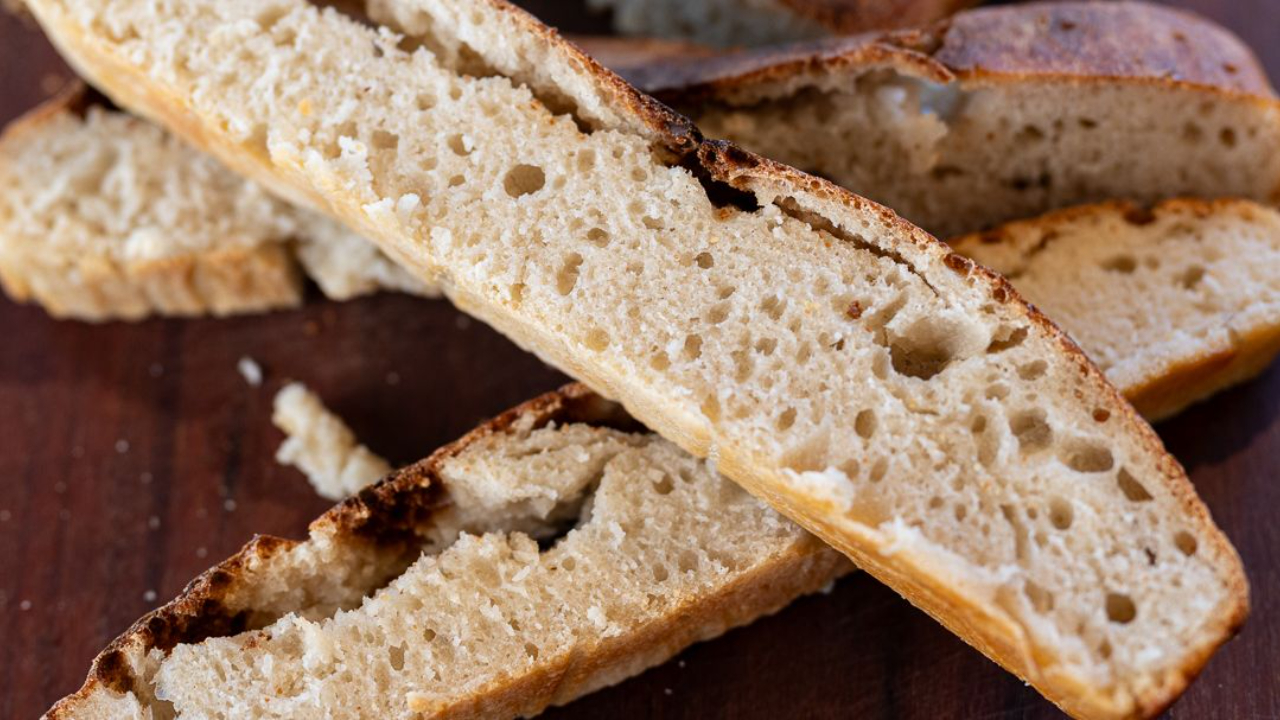
Rēwena bread is a traditional Māori bread made using a fermented potato starter known as a rēwena bug. The result is a soft, slightly sweet, gently sour loaf with a beautiful crust and a flavour that is completely unique. It takes about 15 minutes of real work, and everything after that is patience. Let's bake!
Why This Rēwena Bread Works
A potato starter does the whole job. There is no commercial yeast anywhere in this loaf, just flour, sugar, salt, water and a bubbling rēwena bug.
The bug is the entire recipe. Everything that goes wrong with rēwena bread goes wrong because the starter was not at peak activity when it went into the dough.
This was my very first attempt at making it, and my loaf did not rise as much as I had hoped. The flavour was absolutely delicious anyway, which is worth knowing before you start.
The sugar is not just for sweetness. It feeds the starter and pushes the crust to that deep golden colour, which is why cutting it out entirely does not work.
Twenty years of cooking has not made bread any less of a trial and error business. A flat first loaf is normal, and it still tastes like nothing else.
Recipe Details
- Prep Time: 15 minutes
- Cook Time: 50 minutes
- Total Time: 3 to 7 hours, almost all of it hands-off rising
- Makes: 1 large loaf or 2 small loaves
- Difficulty: Medium
- Special Equipment: Loaf tin or baking dish, mixing bowl
Rēwena bread relies on a lively potato starter to give the dough its rise and its distinctive flavour, so the bug decides everything before you have mixed a thing. Much like sourdough, it should smell slightly sour and feel elastic when stirred, with visible bubbles right through it rather than a few on the surface. The dough itself is very simple, just flour, sugar, salt, water and your active potato bug, and it comes together quite soft and sticky, which is exactly right. My own first loaf did not rise as much as I had hoped, and a starter that was not quite at peak is the likeliest reason, though the flavour was every bit as good. Give it a warm spot and judge it by eye, not by the clock, because a cold kitchen can easily triple the time.
Ingredients
For the Bread:
- 4 cups plain flour (about 600g)
- 4 tablespoons sugar
- 1 teaspoon salt
- 2 cups active rewena potato starter (bubbly and lively!)
- 2 cups warm water
- Butter, for greasing the baking dish
Important: You'll need an active Rēwena bug starter first. My rēwena bug potato starter guide walks through the 4 to 6 days it takes to build one.
How to Make Rēwena Bread
- Check your starter: Before you begin, make sure your Rēwena bug is at peak activity. It should be bubbly, slightly elastic when stirred, and smell gently sour (like sourdough). If it's not very active, give it another feed and wait 12 to 24 hours until it's lively. This is the most important step!
- Mix the dry ingredients: In a large mixing bowl, combine the flour, sugar, and salt. Give it a quick stir to distribute everything evenly.
- Add the starter: Add your 2 cups of active potato starter to the dry ingredients. It should look bubbly and alive! Stir it in.
- Add warm water: Pour in the warm water (not hot, just warm to the touch, about body temperature). Mix everything together with a wooden spoon or your hands until it forms a soft dough. The dough will be quite soft and slightly sticky, this is normal!
- Bring the dough together: Lightly flour your hands and gently knead the dough in the bowl just enough to bring it together into a cohesive mass. Then tip it out onto a very well-floured bench and knead it some more until it feels nicely bound.
- Prepare your tin: Generously butter your loaf tin or baking dish. Make sure you butter the sides and corners well so the bread doesn't stick.
- Transfer to tin: Transfer the dough to your well-buttered tin or dish. You can shape it gently with floured hands if needed, but don't knock out the air. Cover the tin with a clean tea towel or cling film.
- Let it rise: Leave the dough to rise in a warm place for 1.5 to 6 hours, or until roughly doubled in size. How long this takes depends on how warm your kitchen is. Warmer means faster rise. In summer it might only take 2 hours. In winter it could take the full 6 hours. Be patient!
- Preheat your oven: About 30 minutes before you think the bread is ready, preheat your oven to 185C (165C fan / 365F / Gas Mark 4).
- Bake the bread: Once the dough has roughly doubled in size, uncover it and place it in the preheated oven. Bake for 45 minutes. The top should turn golden brown and the bread should sound hollow when tapped on the bottom.
- Finish the crust (optional): If after 45 minutes the top needs more colour, increase the oven temperature to 200C (180C fan / 400F / Gas Mark 6) and bake for a further 5 minutes. Watch it carefully so it doesn't burn!
- Cool before slicing: Remove the bread from the oven and carefully turn it out of the tin onto a wire cooling rack. Let the loaf cool for at least 30 minutes before slicing. If you cut it too soon, the interior will be gummy. I know it's hard to wait, but it's worth it!
- Slice and enjoy: Once cooled, slice and enjoy your beautiful traditional Rēwena bread! It's delicious with butter, jam, or toasted.
Why You'll Love This Recipe
- Unique flavour: Soft, slightly sweet, gently sour, unlike any other bread
- Uses potato starter: If you've made a rēwena bug, this is what to do with it!
- Simple ingredients: Just flour, sugar, salt, water, and your active starter
- Beautiful crust: Golden, slightly crispy exterior with soft interior
- No commercial yeast: All naturally leavened with your potato bug
- A piece of New Zealand baking: A traditional Māori bread that has been made here for generations
Chef's Tips for Rēwena Bread
Starter must be active: This is the most important thing. Your bug should be bubbly and lively, not flat or sluggish, and it wants to be at peak activity rather than just past it. Peak is the difference between a proper rise and a dense loaf.
Judge the rise by eye, not the clock: The warmer the spot, the faster it goes. In summer 2 hours might be enough, in winter give it the full 4 to 6. The only question that matters is whether it has doubled in size, and it will never rise as dramatically as a yeasted loaf.
My first loaf was flat: If yours doesn't rise much, the starter almost certainly wasn't at peak activity when it went in. Mine wasn't, and the loaf still tasted wonderful. Bread is trial and error and a flat first attempt is a completely normal part of it.
Generously butter the tin: Butter the sides and the corners properly so the loaf releases cleanly. This dough is sticky and it will grip a poorly greased tin.
Check the bottom: Tap the base of the loaf when you think it's done. A hollow sound means it's baked through, a dull thud means give it another 5 minutes.
Cool completely: Let it cool for at least 30 minutes before slicing or the crumb will be soft and gummy. This is the hardest rule to follow and the one that most changes the result.
Substitutions & Variations
- Wholemeal flour: Replace up to half the plain flour with wholemeal flour for a nuttier, denser loaf
- Less sugar: You can reduce the sugar to 2 tablespoons if you prefer a less sweet loaf. The sugar helps with browning and feeds the starter, so don't cut it completely.
- Seeds or grains: Fold through a handful of sunflower seeds, pumpkin seeds, or rolled oats before putting the dough into the tin
- Two small loaves: Divide the dough between two smaller tins. Reduce the baking time by about 10 minutes.
Storage
Best eaten fresh: Rēwena bread is at its absolute best on baking day, especially while still slightly warm with nothing on it but butter. Keep it in a bread box or wrapped in a clean tea towel at room temperature for 2 to 3 days, and toast it after that to bring it back to life.
Fridge: Not recommended. The fridge dries bread out far faster than the bench does, and this loaf goes stale and crumbly within a day in there. Room temperature or the freezer, nothing in between.
Freezer: Slice the cooled loaf and freeze it in portions, well wrapped, for up to 3 months. You can toast it directly from frozen, which makes it a brilliant quick breakfast.
Avoid: Don't slice into it while it's warm. The crumb hasn't set yet and you'll pull the loaf into a gummy mess, which is a sad end to a seven hour bake.
Frequently Asked Questions
Do you need a rēwena bug to make rēwena bread? Yes. You need an active potato starter before you can make this bread, and there is no shortcut around it. Building one from scratch takes 4 to 6 days, and the guide is linked in the ingredients above.
How do you know when a rēwena bug is ready to bake with? It should be bubbly right through rather than just on top, smell gently sour like sourdough, and feel slightly elastic when you stir it. If you're unsure, feed it again and wait 12 hours. Don't use it until it's lively.
Why is rēwena bread dough so sticky? Because it's meant to be. Rēwena dough is a soft, wet dough and that's part of what gives the loaf its tender crumb. Use floured hands and keep extra flour on the bench to work in as you knead.
Why didn't my rēwena bread rise? Almost always because the starter wasn't at peak activity. The bug works best when it's bubbling hard, not when it's already started to fall. My own first loaf came out flat for exactly this reason, and it still tasted delicious.
Can you make rēwena bread in a different tin? Yes, any loaf tin or baking dish will do. You can also split the dough into two smaller tins, in which case take about 10 minutes off the baking time.
Can you use a sourdough starter instead of a rēwena bug? You'd get a good loaf, but not this loaf. Sourdough starter has a different flavour and a different rising power, and the potato base is what makes rēwena taste like rēwena.
What do you do if rēwena bread is browning too fast? Lay a sheet of foil loosely over the top for the rest of the bake. This happens most often in ovens that run hot, and covering it lets the inside finish without the crust catching.
How long does rēwena bread keep? Two to three days at room temperature in a bread box or wrapped in a tea towel. After that it's much better toasted, or slice and freeze it on day one.
What do you serve with rēwena bread? Butter while it's still slightly warm is the classic and honestly hard to beat. It toasts beautifully for jam or honey at breakfast, holds up to eggs and avocado, goes brilliantly alongside soup for dipping, and the gentle sourness is very good indeed against a sharp cheddar.
You Might Also Like
Rēwena Bug Potato Starter - Make your own potato starter first using my step-by-step guide!
Homemade Ciabatta Rolls - Another brilliant bread-making project with beautiful results, in both white and wholemeal!
Seeded Porridge Loaf - Got leftover porridge from breakfast? Bake it into this gorgeous, easy seeded loaf!
Potato Bread from Leftover Mash - The other potato loaf on the site, this one built on leftover mash rather than a starter.
Making Rēwena bread for the first time is such a special experience. Even if your first loaf comes out a little flat, and mine did, the flavour is like nothing else you've ever tasted from a bread. The potato starter gives it this gentle sweetness and sourness that is completely its own thing. Once you get your bug active and lively, this comes together in about 15 minutes of actual work, and the rest is just waiting, which is the best kind of recipe.
Enjoy!
Del x
Traditional Rēwena bread, a soft and gently sour Māori loaf raised entirely on a fermented potato starter.
Join the Dishes with Del community.
Stay in the loop with new recipes, exciting announcements, anything to keep you away from the washing up!
No spam here. Just tasty recipes!