
Florentine Biscuits - Elegant Chocolate-Dipped Treats
Florentine Biscuits - Elegant Chocolate-Dipped Italian Treats
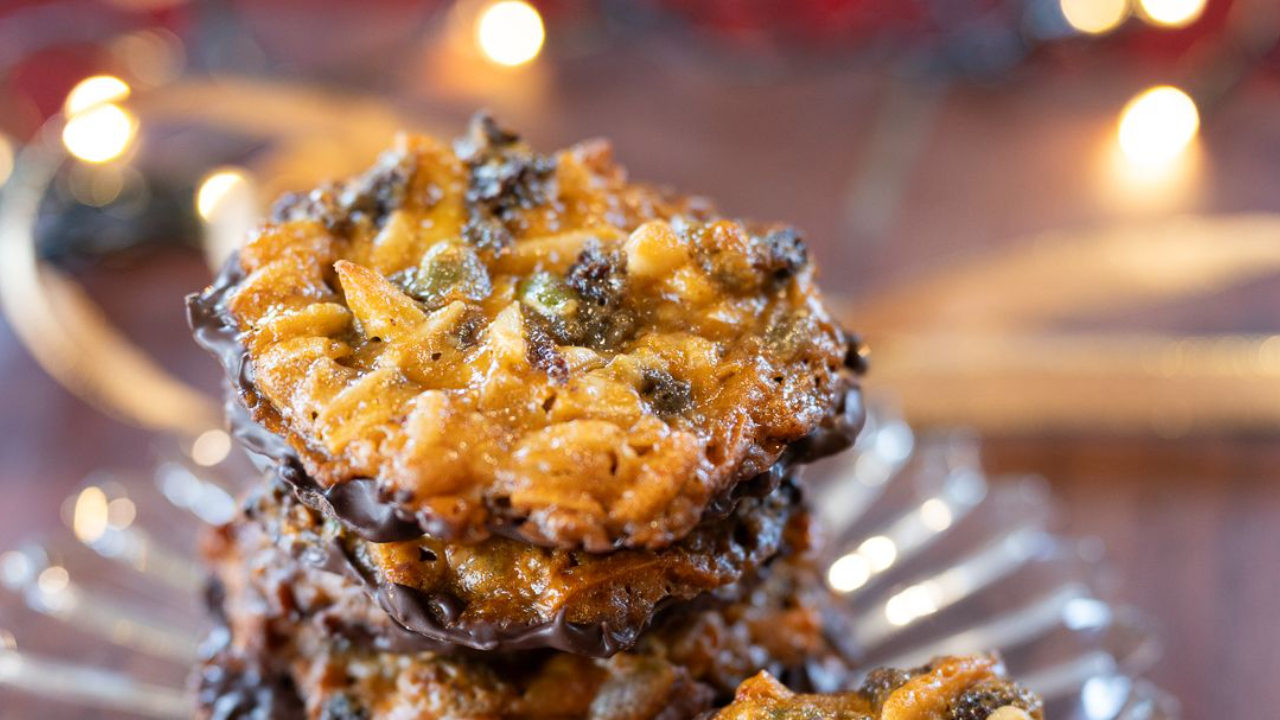
These stunning Florentine biscuits are the ultimate elegant treat. Lacy, caramelised nut and fruit biscuits with a glossy dark chocolate base. Perfect for special occasions, Christmas gifting, or whenever you want to impress with homemade baking and the are my Mums favourite.
Recipe Details:
- Prep Time: 20 minutes
- Cook Time: 10-12 minutes
- Total Time: 30 minutes (plus cooling and setting time)
- Makes: 10 Florentines
- Difficulty: Medium
- Special Equipment: Baking tray, greaseproof paper, small saucepan.
Florentine biscuits are one of the most elegant and sophisticated biscuits you can make at home. These classic Italian-French treats feature a delicate, lacy base studded with flaked almonds, chopped macadamias, and sweet raisins, all bound together with a golden caramel made from butter, sugar, and golden syrup. The addition of orange zest brings a bright citrus note that cuts through the richness beautifully. Once baked to a gorgeous golden colour and cooled until crisp, each Florentine is dipped in rich dark chocolate, creating that signature glossy chocolate base. The contrast between the crunchy, nutty, caramel top and the smooth dark chocolate bottom is absolutely divine. While they look incredibly sophisticated and bakery-worthy, they're surprisingly straightforward to make at home. The key is allowing them to cool completely before adding the chocolate. These make stunning edible gifts, look spectacular on any dessert platter, and are perfect alongside coffee or as an after-dinner treat. They're also naturally gluten-free if you use gluten-free flour.
Why You'll Love This Recipe
- Bakery-quality at home: Create professional-looking Florentines that rival anything from expensive patisseries
- Perfect for gifting: Package them beautifully for impressive homemade Christmas or special occasion gifts
- Elegant and sophisticated: These look and taste incredibly refined - perfect for special celebrations
- Wonderful texture: The combination of crunchy caramel, chewy fruit, and smooth chocolate is irresistible
- Naturally impressive: They look complicated but are actually quite simple to make once you know how
Ingredients
For the Florentine Biscuits:
- 25g salted butter
- 25g light muscovado sugar
- 25g golden syrup
- 25g plain flour
- 38g slithered almonds
- 25g macadamias, roughly chopped
- 10g of pumpkin seeds
- 25g raisins, roughly chopped
- Zest of 1 orange
For the Chocolate Base:
- 90g dark chocolate (70% cocoa works well)
Instructions
1. Preheat and prepare: Preheat your oven to 180°C (160°C fan/350°F). Line a large baking tray with greaseproof paper or a silicone baking mat. Make sure your tray is completely flat as the Florentines spread during baking.
2. Prepare the nuts and fruit: Roughly chop the macadamias and raisins so they're in small, even pieces. Finely grate the zest from the orange. Add all the other nuts and seeds to. Set everything aside together in a small bowl.
3. Make the caramel base: In a small saucepan, combine the butter, muscovado sugar, and golden syrup. Place over low-medium heat and stir continuously until the butter has melted and the sugar has completely dissolved. Let it bubble gently for about 1 minute until it becomes slightly syrupy. Don't let it boil vigorously and get too dark.
4. Add the flour: Remove the pan from the heat and immediately stir in the flour. Mix well until completely smooth with no lumps. The mixture will thicken considerably.
5. Add the nuts, fruit, and zest: Add the flaked almonds, chopped macadamias, pumpkin seeds, chopped raisins, and orange zest to the mixture. Stir thoroughly until everything is evenly coated in the caramel mixture. Work quickly as the mixture will start to set as it cools.
6. Shape the Florentines: Working quickly while the mixture is still warm and pliable, spoon heaped teaspoonfuls of the mixture onto your prepared baking tray. Space them well apart, as they will spread significantly during baking. You should be able to fit 6 per large tray. Gently flatten each mound slightly with the back of a spoon.
7. Bake: Place in the preheated oven and bake for 10-12 minutes. Watch them carefully - they should spread out into thin, lacy circles and turn a beautiful deep golden-brown colour. The edges will be darker than the centres. They'll still look soft and bubbly when you remove them, which is correct.
8. Shape while warm (optional but recommended): Remove from the oven and let the Florentines cool on the tray for 2-3 minutes until they just start to firm up but are still pliable. If you want perfect circles, you can gently use a round cookie cutter to trim the edges while they're still slightly soft, or use a palette knife to tuck in any stray bits. Work quickly as they firm up fast.
9. Cool completely: Leave the Florentines on the tray until completely cool and crisp. This takes about 15-20 minutes. Don't try to move them while they're still warm or they'll break. Once cool, they should lift off easily and be crisp throughout.
10. Melt the chocolate: Break the dark chocolate into small pieces and place in a heatproof bowl. Melt gently. Either in 20-second bursts in the microwave, stirring between each burst, or set the bowl over a pan of barely simmering water (bain-marie method). Stir until smooth and glossy. Let it cool for 2-3 minutes so it's not too hot.
11. Apply the chocolate: Turn each Florentine upside down so the flat base is facing up. Using a spoon or palette knife, spread melted chocolate evenly over the base of each Florentine. You want a nice thick layer but not so much that it drips over the sides.
12. Create the wavy pattern: While the chocolate is still wet, use a fork to create the traditional wavy pattern in the chocolate. Drag the fork prongs across the chocolate in wavy lines. This is the signature Florentine finish and helps the chocolate set with texture.
13. Set the chocolate: Place the chocolate-coated Florentines on a clean sheet of greaseproof paper, chocolate side up. Leave them at cool room temperature to set, or place in the refrigerator for 15-20 minutes to speed up the process. The chocolate should be firm and set completely before serving or storing.
Chef's Tips
For the best results: Work quickly when shaping the warm mixture. It becomes harder to work with as it cools, so have everything ready before you start.
Spacing is crucial: These spread a lot during baking. Give them plenty of space on the tray. It's better to bake in batches than overcrowd the tray.
Watch the colour: Florentines go from perfect to burnt quite quickly. They should be a deep golden brown but not dark brown. Start checking at 8 minutes.
Cool completely before chocolate: Make sure the Florentines are completely cool before adding chocolate or the chocolate will melt and become messy. They should be crisp and room temperature.
Chocolate temperature: Let your melted chocolate cool slightly before spreading. If it's too hot, it will be very thin and runny. Slightly cooled chocolate spreads more easily and creates a better finish.
Store carefully: These are delicate. Layer them between sheets of greaseproof paper in an airtight container to prevent breakage and sticking.
Substitutions & Variations
Different nuts: Swap your nuts for hazelnuts, pecans, or more almonds. You can also use a mix of whatever nuts you have on hand.
Dried fruit variation: Replace the raisins with chopped dried cranberries, glace cherries, or sultanas for a different flavour.
Orange and ginger: Add ½ teaspoon of ground ginger to the flour for a warm, spiced version that pairs beautifully with the orange.
White or milk chocolate: Use white chocolate or milk chocolate instead of dark for a sweeter version. White chocolate looks particularly elegant.
Seed addition: Add 1 tablespoon of sesame seeds or sunflower seeds for extra crunch and nutrition.
Gluten-free: Replace the plain flour with gluten-free flour or ground almonds. The texture will be slightly different but still delicious.
Mini Florentines: Make smaller versions using half teaspoons of mixture. Reduce baking time to 8-10 minutes. Perfect for petits fours.
Storage & Reheating
Storage: Store completely cooled and set Florentines in an airtight container at room temperature, layered between sheets of greaseproof paper, for up to 1 week. Keep them somewhere cool and dry.
Refrigeration: In warm weather, store in the refrigerator to prevent the chocolate from melting or blooming. Let them come to room temperature for 15 minutes before serving for the best flavour and texture.
Gifting timeline: Make these up to 3 days before gifting. They actually improve slightly after a day as the flavours meld together.
Packaging for gifts: Layer in small gift boxes between tissue paper, pack in cellophane bags tied with ribbon, or arrange in decorative tins. They make stunning homemade gifts for Christmas or special occasions.
Frequently Asked Questions
Q: Why did my Florentines spread too much and merge together? A: They weren't spaced far enough apart. These spread significantly - you need at least 8-10cm between each mound. It's better to bake in batches than overcrowd the tray.
Q: My Florentines broke when I tried to lift them. What went wrong? A: They likely weren't cooled enough. Let them cool completely on the tray until they're totally crisp before trying to move them. They're very fragile when warm but sturdy once cool.
Q: Can I make these without golden syrup? A: Golden syrup is quite essential for the right texture and flavour, but in a pinch you could use honey or maple syrup. The flavour will be different but they'll still work.
Q: Why is my chocolate not setting? A: The Florentines might still have been warm when you added the chocolate, or your kitchen might be very warm. Pop them in the fridge for 15-20 minutes to set the chocolate quickly.
Q: How do I get neat, round Florentines? A: While they're still slightly warm and pliable (2-3 minutes after removing from the oven), use a round cookie cutter to trim the edges, or use a palette knife to gently tuck in stray bits. Work quickly before they cool and harden completely.
Q: Can I make these ahead for Christmas? A: Absolutely! Make them up to 1 week ahead and store in an airtight container, or freeze them for up to 2 months. They're perfect for Christmas cookie tins and gifts.
You Might Also Like
Gingerbread Spiced Shortbread - Another elegant biscuit perfect for Christmas gifting with warm festive spices and buttery texture.
Candied Orange Peel with Chocolate - Continue your chocolate-dipping adventures with these sophisticated candied orange peels that make beautiful gifts.
Enjoy!
Del x
These elegant Florentine biscuits look incredibly sophisticated but are surprisingly simple to make. Perfect for special occasions, Christmas gifts, or whenever you want to impress!
Join the Dishes with Del community.
Stay in the loop with new recipes, exciting announcements, anything to keep you away from the washing up!
No spam here. Just tasty recipes!
