
White Ciabatta Rolls - Easy Bakery-Style Bread Recipe
White Ciabatta Rolls - Easy Bakery-Style Bread Recipe
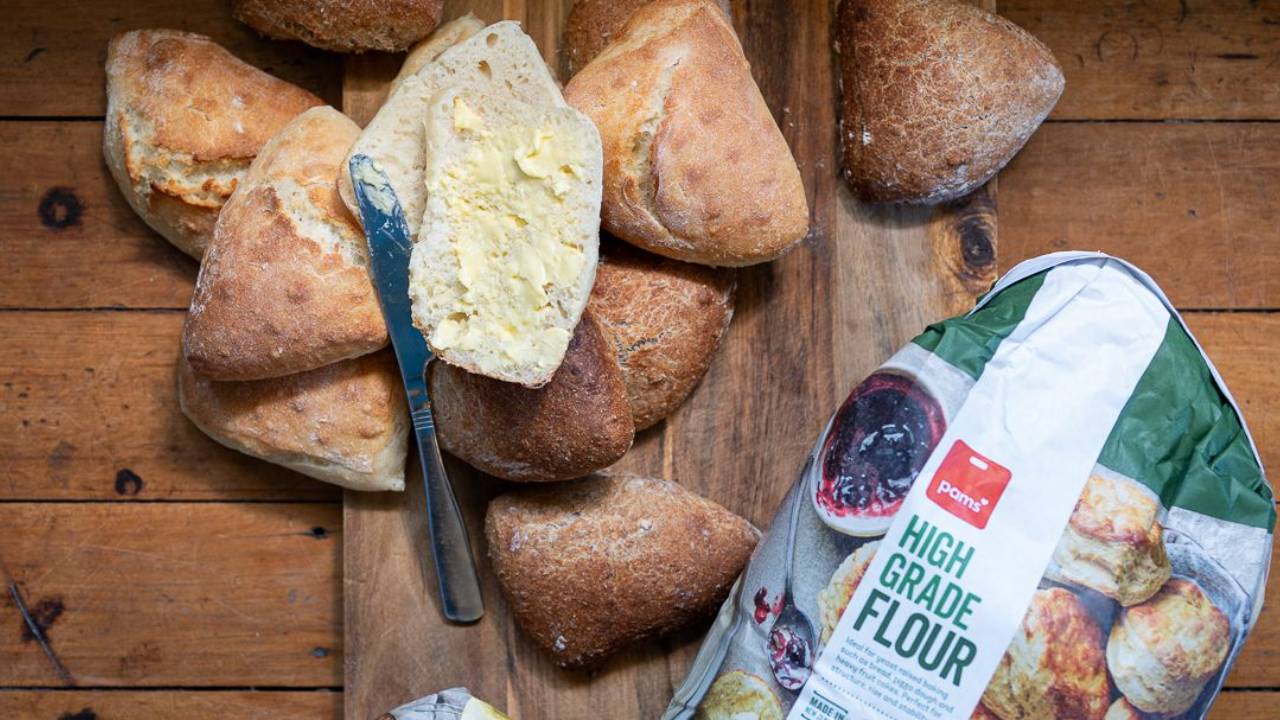
These homemade white ciabatta rolls are INCREDIBLE! Light, airy, beautifully crusty on the outside with those characteristic irregular holes throughout. Using the stretch-and-fold method instead of kneading, they're surprisingly EASY to make and require just 10 minutes of active work. The rest is hands-off resting time! They taste absolutely AMAZING, and they're perfect for sandwiches, dipping in olive oil, or serving alongside Italian meals!
Recipe Details:
- Active Time: 10 minutes
- Resting Time: 1 hour 50 minutes
- Baking Time: 20-25 minutes
- Total Time: 2 hours 20 minutes
- Makes: 6 ciabatta rolls
- Difficulty: Medium
- Special Equipment: Large bowl, 2 baking trays, tea towel
Ciabatta might SOUND fancy, but it's honestly one of the EASIEST artisan breads you can make at home! The secret is in the technique, instead of traditional kneading, we're using the stretch-and-fold method. This is BRILLIANT for high-hydration doughs like ciabatta because it develops the gluten gently and creates those gorgeous irregular holes without all the hard work of kneading. The dough is quite wet and sticky (this is totally normal and exactly what you want!), which is what gives ciabatta its signature light, airy texture. You're only actively working with the dough for about 10 minutes total - the rest is just resting and proving time, which means you can get on with other things while your bread does its thing! What I LOVE about these rolls is how versatile they are. The crusty exterior holds up brilliantly to sandwich fillings (no soggy bread here!), they're incredible for dipping in good olive oil with balsamic vinegar, and they're absolutely DIVINE served warm with butter alongside soup or pasta. Once you've tasted fresh, homemade ciabatta, you'll never want to buy the shop-bought stuff again. These are lighter, fluffier, crustier, and taste SO much better. Plus, there's something incredibly satisfying about pulling apart a warm ciabatta roll and seeing all those beautiful irregular holes!
Why You'll Love This Recipe
- Bakery-quality at home: Light, airy, and perfectly crusty
- No kneading required: Stretch-and-fold method is SO much easier
- Mostly hands-off: Only 10 minutes active work - the rest is resting time
- Perfect texture: Irregular holes and light, fluffy interior
- Impressive results: They look and taste INCREDIBLE
- Better than shop-bought: Fresher, tastier, no preservatives!
Ingredients
For the Ciabatta Rolls:
- 450g bread flour (about 3 cups), plus extra for dusting
- 355ml warm water (32°C / 90°F)
- 9g cooking salt (about 1¾ teaspoons)
- 30ml olive oil (2 tablespoons)
- 5g dry yeast (about 1½ teaspoons)
- Sea salt, for finishing
Instructions
Step 1: Prep and proof the dough
Place the yeast in a large bowl and pour in the warm water. Mix until the yeast is completely dissolved - give it a good stir to make sure there are no lumps. Pour in the olive oil and give it another quick mix. Add the flour and salt to the bowl. Using a wooden spoon or your hands, mix everything together until just combined and all the flour is fully hydrated. The dough will be very wet and sticky - this is exactly what you want! Don't worry about it being smooth at this stage. Cover the bowl with a clean tea towel and let it rest for 30 minutes at room temperature. This resting period allows the flour to fully hydrate and the gluten to start developing naturally.
Step 2: Stretch and fold the dough (Round 1)
After 30 minutes, uncover the dough. Wet one of your hands with water (this stops the dough sticking to you). Reach under one edge of the dough, stretch it upwards, and fold it over the top of itself towards the opposite side. Rotate the bowl 90 degrees and repeat - stretch and fold. Do this 4 times in total until you've folded all four "corners" of the dough over itself. The dough should feel slightly more structured now. Cover the bowl again with the tea towel and let it rest for 20 minutes. You can head to my YouTube channel if you want to see this in action.
Step 3: Stretch and fold the dough (Round 2)
Uncover the dough and wet your hand again. Repeat the exact same stretching and folding process - 4 stretches and folds, rotating the bowl each time. You'll notice the dough feels smoother and more elastic now. Cover and rest for another 20 minutes.
Step 4: Stretch and fold the dough (Round 3)
Uncover and repeat the stretching and folding process one more time - 4 stretches and folds with a wet hand, rotating the bowl between each fold. The dough should be noticeably smoother, more elastic, and hold its shape better. Cover and rest for 20 minutes.
Step 5: Stretch and fold the dough (Round 4 - Final)
This is your final stretch-and-fold round! Uncover the dough and repeat the process one last time - 4 stretches and folds, wet hand, rotating the bowl. The dough should now be beautifully smooth, elastic, and full of air. Cover and let it rest for a final 20 minutes. This is the last rest before shaping!
Step 6: Preheat and prepare
While the dough is doing its final rest, preheat your oven to 220°C (428°F). This needs to be REALLY hot, so give it plenty of time to fully preheat. Line 2 large baking trays with baking paper and set them aside ready.
Step 7: Shape and proof
After the final 20-minute rest, turn the dough out onto a lightly floured work surface. The dough will be quite soft and puffy - handle it GENTLY to preserve all those lovely air bubbles! Using your hands or a dough scraper, gently stretch the dough to an even thickness - you're aiming for a rough rectangle shape. Lightly dust the top of the dough with flour. Using a sharp knife or dough scraper, cut the dough into 6 equal rectangular portions. Carefully transfer each portion to your prepared baking trays, spacing them well apart (they will spread!). Aim for 3 rolls per tray. Cover the trays loosely with a clean tea towel and let the rolls proof for 30 minutes. They should puff up slightly and look airy.
Step 8: Bake
After proofing, uncover the rolls. If you like, you can sprinkle a tiny bit of sea salt over the tops for extra flavour and crunch. Place both trays in the preheated oven (you may need to bake in batches if they don't both fit). Bake for 20-25 minutes until the rolls are beautifully golden brown on top and sound hollow when you tap them on the bottom. They should have risen nicely and developed a lovely crispy crust.
Step 9: Cool
Remove the rolls from the oven and transfer them immediately to a wire cooling rack. Let them cool COMPLETELY before slicing. This is really important - if you cut into them while they're still warm, the interior will be gummy and wet. As they cool, the interior structure sets properly. Once cool, they're ready to enjoy!
Chef's Tips
Water temperature is key: 32°C/90°F is perfect - warm to the touch but not hot. Too hot kills the yeast!
Don't add extra flour: The dough is meant to be very wet and sticky. This creates those beautiful holes. Resist the urge to add more flour!
Always wet your hands: Before every stretch-and-fold, wet your hands. This stops the dough sticking to you.
Be gentle when shaping: Don't knock the air out! Handle the dough as gently as possible when turning out and cutting.
Space them well: These rolls spread and rise, so give them plenty of room on the trays.
Hot oven essential: Make sure your oven is fully preheated to 220°C - a hot oven creates the best crust and oven spring.
Add steam for better crust: Place a small tray of water on the bottom shelf of your oven while baking for a crispier crust.
Cool completely: I know it's tempting, but let them cool fully before slicing. The texture is SO much better!
Substitutions & Variations
Plain flour instead of bread flour: You can use plain flour, but bread flour's higher protein content creates better texture and chew.
Add flavourings: Mix in dried herbs (rosemary, oregano), olives, sun-dried tomatoes, or grated cheese during the initial mixing.
Wholemeal version: Use 100g bread flour + 300g wholemeal flour for a healthier version (see my wholemeal ciabatta roll recipe!).
Seeded version: Add 50g mixed seeds (sunflower, pumpkin, sesame) to the dough.
Parmesan ciabatta: Add 50g grated parmesan to the dough for extra flavour.
Larger loaves: Instead of cutting into 6 rolls, cut into 3 larger portions for sub-style rolls.
Storage & Reheating
Best served fresh: These ciabatta rolls are at their absolute best on the day they're baked - still warm from the oven with a crispy crust!
Room temperature storage: Store in a paper bag or bread box (NOT plastic - it makes the crust soggy!) for up to 2 days.
Refresh the crust: Day-old rolls can be refreshed! Sprinkle with a little water and pop in a hot oven (200°C) for 5 minutes. The crust will crisp up beautifully again.
Freezing: Freeze completely cooled rolls in a sealed freezer bag for up to 3 months. They freeze brilliantly!
Defrosting: Defrost at room temperature for 1-2 hours, then refresh in a hot oven for 5 minutes to crisp the crust.
Toast them: Day-old ciabatta makes INCREDIBLE toast - slice and toast until golden and crispy!
Make ahead dough: You can make the dough, complete all the stretch-and-folds, then cover and refrigerate overnight. Let it come to room temperature (about 1 hour) before shaping and baking.
Frequently Asked Questions
Q: My dough is really wet and sticky. Is this normal? A: Yes! Ciabatta dough is meant to be very wet and sticky - this high hydration is what creates those beautiful irregular holes. Keep your hands wet and resist adding extra flour.
Q: Can I use plain flour instead of bread flour? A: You can, but bread flour is better because of its higher protein content. It creates better gluten development and a chewier texture.
Q: What if I don't have time for all the rests? A: Don't skip them! Each rest period is crucial for gluten development and flavour. If you're short on time, this isn't the recipe to rush.
Q: Can I knead this dough instead of stretching and folding? A: You could, but the stretch-and-fold method is specifically designed for high-hydration doughs and creates better results with less effort.
Q: Why are my rolls flat instead of risen? A: Either your yeast wasn't active, your oven wasn't hot enough, or you didn't give them enough proofing time. Make sure your water is the right temperature and your yeast is fresh.
Q: Can I add flavourings to the dough? A: Absolutely! Add dried herbs, olives, sun-dried tomatoes, cheese, or garlic during the initial mixing stage.
Q: How do I know when they're done baking? A: They should be golden brown and sound hollow when you tap them on the bottom. Internal temperature should be around 95°C if you have a thermometer.
Q: Why do I need to cool them completely before slicing? A: The interior is still setting as it cools. If you slice while warm, it'll be gummy and wet. Cooling lets the structure set properly.
You Might Also Like
Wholemeal Ciabatta Rolls - A healthier version using wholemeal flour - just as delicious!
2-Ingredient Yoghurt Flatbreads - Another easy homemade bread that takes just 20 minutes!
Homemade Healthy Seed Crackers - Perfect for serving with dips alongside these beautiful rolls.
Seeded Porridge Loaf - Made from leftover porridge and it is another great bread!
Enjoy!
Del x
These white ciabatta rolls are absolutely INCREDIBLE! Light, airy, perfectly crusty, with those beautiful irregular holes throughout. The stretch-and-fold method means no kneading required, and they taste SO much better than anything shop-bought. Once you make these, you'll never buy ciabatta rolls again!
Join the Dishes with Del community.
Stay in the loop with new recipes, exciting announcements, anything to keep you away from the washing up!
No spam here. Just tasty recipes!

