
Perfect Beef Wellington - Always Medium Rare Every Time
Perfect Beef Wellington - Always Medium Rare Every Time
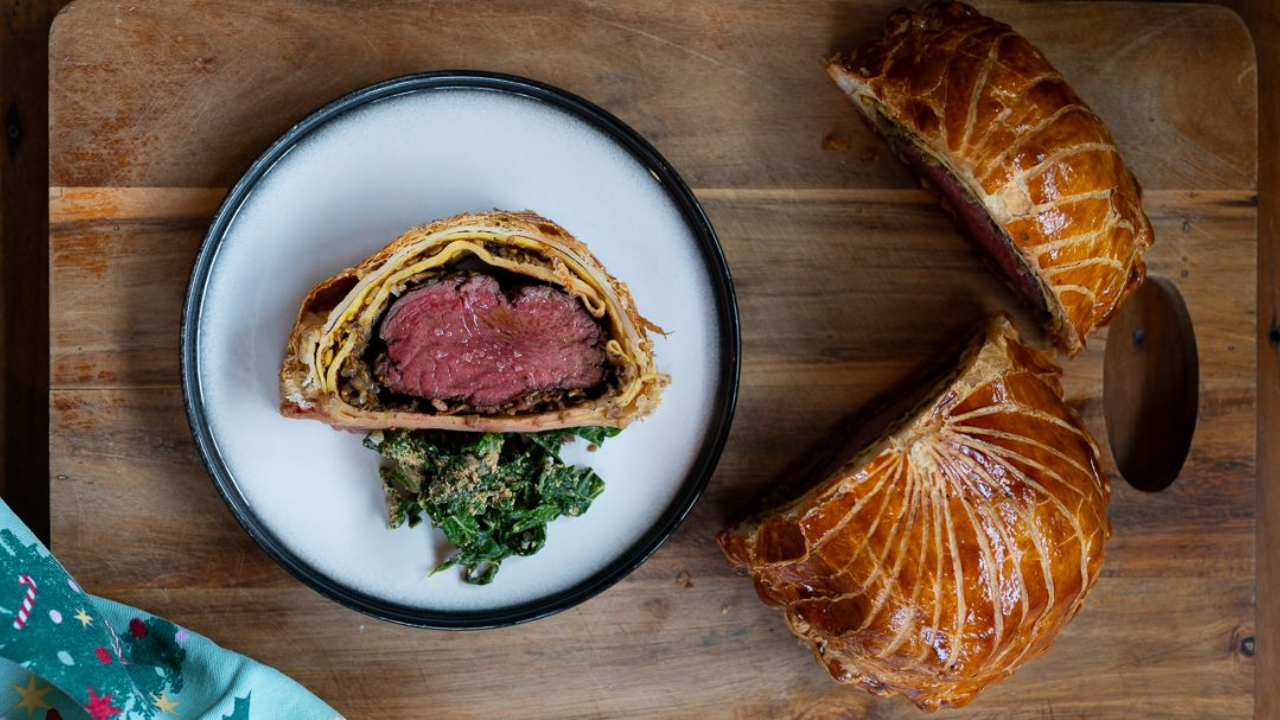
This is the most perfectly pink beef Wellington you've probably ever seen. And I'm going to show you the secret trick that guarantees medium rare every single time, no matter the size. Six easy steps to the ultimate Christmas showstopper that any home cook can master.
Recipe Details:
- Prep Time: 45 minutes (plus chilling time)
- Cook Time: 25-30 minutes (plus 15 minutes resting)
- Total Time: 2 hours 30 minutes
- Serves: 3-4 (from 550g beef fillet)
- Difficulty: Medium
- Special Equipment: Meat thermometer (essential!), food processor (optional), rolling pin, baking tray, wire rack
After making beef Wellington countless times in my 20+ years as a professional chef, I can guarantee that any single one of you home cooks can make this spectacular dish. The secret? A meat thermometer. That's it. While recipes tell you to cook for 35 minutes, you don't actually know what's happening inside. We're going to cook it to exactly 52°C internal temperature, then rest it for 15 minutes, perfect medium rare every single time. This recipe breaks down every component into simple steps: preparing the beef, making the mushroom duxelles, cooking crêpes, searing and wrapping, assembling in pastry, and finally baking. We'll tackle all the common problems, soggy bottoms, overcooked meat, wet duxelles, and I'll show you exactly how to avoid them. This isn't complicated, it just requires precision. Everything can be prepared the day before, wrapped, and refrigerated, ready to bake on Christmas Day. This is your showstopping centrepiece that will impress everyone at your Christmas table. Let me show you how to make it perfect. Serve with my Rich Slow-Cooked Beef Gravy made from roasted bones and reduced to an intensely glossy sauce, it's the perfect match for Wellington.
Why You'll Love This Recipe
- Always perfectly pink: Using a meat thermometer means medium rare beef Wellington every single time
- Avoids soggy bottoms: Multiple techniques ensure crispy pastry, elevated baking, dry components, crêpe layer
- Make-ahead friendly: Prepare everything the day before, assemble and bake on Christmas Day
- Professional results: 20+ years of chef experience distilled into foolproof home cook steps
- Ultimate showstopper: The most impressive Christmas centrepiece you can make
Ingredients
For the Beef:
- 550g beef fillet (centre cut, consistent width throughout)
- 2 tablespoons olive oil for searing
- Salt and pepper
For the Mushroom Duxelles:
- 400g mushrooms (any variety)
- 1 onion, finely diced
- 3 cloves garlic, finely chopped
- Small bunch fresh thyme, leaves picked
- Olive oil
- Salt and pepper
For the Crêpes:
- Equal parts (by volume) of: eggs, milk, and plain flour (approximately 100ml each)
- Fresh herbs (parsley, chives, thyme - optional but lovely)
- Salt and pepper
For Assembly:
- 2-3 tablespoons Dijon or wholegrain mustard (or a mix)
- 2 x 320g sheets ready-rolled puff pastry
- 2 egg yolks, beaten (for glazing)
Instructions
Stage 1: Prepare the Beef
1. Dry the beef: When you buy your beef fillet, take it straight out of the packaging, place on a plate, and refrigerate uncovered overnight or for at least 4 hours. This dries the surface, allowing for a perfect sear. If it's wet, you won't get the Maillard reaction and that beautiful crust.
2. Choose the right cut: Use the centre section of the fillet, it should be the same circumference from end to end. Avoid the thick end or the thin tail. Check in the packet that it's one solid piece, not two pieces tied together. Consistent width means even cooking.
3. Trim the beef: Remove any strings. Trim off any fat and silver skin (connective tissue). Slide a sharp knife under the sinew and along the meat to remove it in one piece without losing meat. The beef should be all clean meat.
4. Season generously: Season the beef all over with plenty of salt and pepper. Be generous - you'll lose some in the pan and some when transferring. Under-seasoned beef is disappointing.
5. Sear the beef: Heat a frying pan until hot. Add a drizzle of oil and sear the beef on all sides, including the ends, until deeply golden brown all over. This takes about 6-8 minutes total. Don't turn too quickly, let each side develop a proper crust before moving. This is about flavour, not cooking the meat through.
6. Chill immediately: Transfer the seared beef to a plate and refrigerate immediately to stop the cooking and cool it down completely.
Stage 2: Make the Mushroom Duxelles
7. Prepare the mushrooms: Chop or blitz the mushrooms into very fine pieces. Use a food processor if you have one, or chop by hand into thin slivers, then cross-chop into tiny pieces. They should look almost minced.
8. Prepare aromatics: Finely dice the onion. Finely chop the garlic. Pick the thyme leaves from the stalks.
9. Cook the mushrooms: Heat a large frying pan (large surface area is important!) over medium heat. Add a drizzle of olive oil and all the chopped mushrooms. Season with salt. Cook, stirring occasionally, until all the moisture has evaporated and the mushrooms look dry and start to caramelise. This takes about 15 minutes. The salt helps draw out moisture.
10. Add aromatics: Once the mushrooms are dry and caramelised, add the onion, garlic, and thyme. Cook for another 5 minutes until the onions are soft and everything is cooked through.
11. Check consistency: The duxelles should be dry and have a slightly tacky, paste-like quality - think olive tapenade or pâté consistency, not wet or runny. If there's still moisture, keep cooking. Season with salt and pepper to taste.
12. Cool completely: Transfer to a plate and leave to cool completely before using.
Stage 3: Make the Crêpes
13. Make the batter: Measure equal volumes of eggs, milk, and plain flour (about 100ml each). Beat the eggs and milk together first, then whisk in the flour until smooth. If using fresh herbs, finely chop and add them now. Season with salt and pepper.
14. Cook thin crêpes: Heat a non-stick frying pan over medium heat. Add a tiny bit of oil. Pour in half the batter and swirl to coat the pan thinly. Cook for 1-2 minutes until set and lightly golden, then flip and cook the other side for 30 seconds. Slide onto a plate. Repeat with the remaining batter to make a second crêpe. You need two large, thin crêpes.
15. Cool completely: Let the crêpes cool completely before using.
Stage 4: Assemble the Beef in Crêpes
16. Prepare your work surface: Lay out the two crêpes slightly overlapping on a sheet of cling film (if you are making this the day before. but if you are cooking it also that day the cling film is not necessary)
17. Spread mustard: Spread a thin, even layer of mustard over the crêpes. Use Dijon, wholegrain, or a mixture, this adds flavour and acts as a sticky binder.
18. Spread duxelles: Spread the cooled mushroom duxelles evenly over the mustard-covered crêpes, going right to the edges.
19. Add the beef: Place the chilled, seared beef fillet in the centre of the duxelles.
20. Wrap tightly: If using cling film, you can use it to help, fold the sides of the crêpes over the beef, then roll it up tightly, using the cling film to create a tight cylinder. The crêpes should completely enclose the beef with duxelles all around. Twist the ends of the cling film to secure. But if not just roll it and sit it on a plate.
21. Freeze for 20-30 minutes: Place the beef in the freezer for 20-30 minutes to firm up. This makes it much easier to wrap in pastry without it falling apart or warming the pastry.
Stage 5: Wrap in Puff Pastry
22. Prepare the pastry: Unroll the ready-rolled puff pastry. Turn it over and remove the plastic sheet it came on. Replace with fresh greaseproof paper underneath. Cut the pastry in half.
23. Beat egg yolks: Beat the 2 egg yolks in a small bowl for glazing. You only want yolks for that deep golden colour.
24. Remove beef from freezer: Take the beef out of the freezer, it should be firm and cold.
25. Wrap in pastry: Place the beef cylinder on one half of the pastry. Brush egg yolk around the edges. Lift the pastry over the beef and press to seal, tucking the ends in tightly like wrapping a present. Make sure to push out all air pockets. Trim any excess pastry and crimp the edges to seal completely.
26. Transfer to tray: Carefully transfer the wrapped Wellington onto a baking tray lined with greaseproof paper, seam-side down.
27. Crimp and decorate edges: Use a small skewer or fork to create a scalloped decorative edge all around, pressing the pastry layers together as you go.
28. First glaze: Brush the entire Wellington generously with egg yolk, getting into every crevice. Make sure the coverage is even.
29. First chill: Place in the freezer for 15-20 minutes until the egg glaze is completely set and looks shiny.
30. Second glaze: Remove from freezer and brush with a second coat of egg yolk. This double glazing creates that spectacular deep golden colour.
31. Second chill: Return to the freezer for another 10-15 minutes while you preheat the oven to 200°C (180°C fan/400°F).
Stage 6: Score, Bake, and Serve
32. Score the Wellington: Remove from freezer. Using a sharp knife, score decorative curved lines across the top in a crisscross or fan pattern. Cut through the egg wash but NOT through the pastry, you're just marking it for decoration.
33. Prepare elevated baking: Place a wire rack or slotted tray inside your baking tray, or use a preheated baking tray that's been in the oven for 5 minutes. This elevation allows hot air to circulate underneath, preventing soggy bottoms.
34. Bake: Place the Wellington on the elevated rack and bake at 200°C for 25 minutes.
35. Check the temperature (THE SECRET!): After 25 minutes, insert a meat thermometer through the side of the Wellington into the centre of the beef (not straight down from the top - go in from the side at an angle). You want 52°C internal temperature. If it's not there yet, give it another 5 minutes and check again. This is the magic trick, cooking to temperature, not time!
36. Rest: Once it reaches 50-52°C, remove from the oven. Let it rest for 15 minutes on the tray. Don't skip this! The temperature will continue to rise to about 54-55°C (perfect medium rare) and the juices will redistribute throughout the meat.
37. Slice and serve: Using a sharp knife, slice the Wellington into thick slices (about 3-4cm). The beef should be perfectly pink throughout, the pastry golden and crisp, with no pools of juice running out. Serve with my crispiest roast potatoes for the full restaurant treatment.
Chef's Tips
For perfectly pink beef every time: Buy a meat thermometer! They cost just a few dollars and guarantee perfect results. Cook to 52°C internal temperature, not by time.
Avoid soggy bottoms: Keep everything cold during assembly. Cook the duxelles until bone dry. Use the crêpe layer as a moisture barrier. Bake on an elevated rack or preheated tray. These steps together create crisp pastry.
Choose the right beef: The centre cut of the fillet should be the same width from end to end. Inconsistent width means uneven cooking. Check carefully in the packet, avoid pieces that are two sections tied together.
Dry the beef first: Taking it out of the packet and refrigerating uncovered overnight dries the surface, allowing for perfect searing and crust development.
Don't turn beef too early: Let each side develop a proper crust before turning. The meat will naturally release when it's ready.
Duxelles must be dry: This is crucial! Cook until it's paste-like, not wet. Use a large pan for faster evaporation. Wet duxelles = soggy pastry.
The freezer is your friend: Chilling between stages keeps everything cold and makes assembly much easier. Cold components = crisp pastry.
Double glazing matters: Two coats of egg yolk create that spectacular deep golden finish. Let each coat set in the freezer before adding the next.
Substitutions & Variations
Individual Wellingtons: Use 200g fillets and make individual portions. Adjust cooking time to 18-20 minutes, still checking with thermometer.
Pancetta or Parma ham: Traditional recipes use Parma ham instead of crêpes. Lay slices overlapping on cling film, spread with duxelles, and wrap the beef.
Different mushrooms: Use a mix of wild mushrooms, shiitake, or portobello for deeper flavour.
Add pâté: Spread a thin layer of pâté on the crêpes before the duxelles for extra richness.
Herb variations: Add fresh tarragon or parsley to the duxelles for different flavour notes.
Truffle oil: Add a drizzle of truffle oil to the cooled duxelles for ultimate luxury.
No thermometer?: While not recommended, cook for 35-40 minutes for a 550g fillet, but results will be less reliable.
Really level up: Pair your Wellington with a homemade Béarnaise, it's the same technique as my easy blender hollandaise, just with extra tarragon and a little fresh chervil stirred through at the end.
Storage & Reheating
Make-ahead assembly: You can assemble the entire Wellington (wrapped in crêpes and duxelles, ready for pastry) the day before. Wrap tightly in cling film and refrigerate for up to 24 hours. Wrap in pastry and bake when needed.
Fully assembled storage: Once wrapped in pastry, you can refrigerate for up to a day before baking.
Leftover storage: Store leftover cooked Wellington wrapped in foil in the fridge for up to 2 days.
Reheating: Reheat slices in a 160°C oven for 10 minutes until warmed through. The beef will cook further, so it won't stay medium rare.
Best served fresh: Wellington is best served straight after resting. The pastry loses its crispness over time.
Frequently Asked Questions
Q: Why do I need a meat thermometer? A: It's the only way to guarantee perfect medium rare beef. Cooking by time alone doesn't account for variations in oven temperature, beef thickness, or how cold your beef was. Temperature is everything - 52°C internal means perfect results every time.
Q: Can I make this without the crêpes? A: Yes, you can use Parma ham or prosciutto instead, or omit this layer entirely. However, the crêpes create an excellent moisture barrier that helps prevent soggy bottoms.
Q: My beef Wellington has a soggy bottom. What went wrong? A: Usually caused by wet duxelles, warm components, or baking directly on a flat tray. Make sure your duxelles is completely dry, everything is cold when assembling, and bake on an elevated wire rack. But sometimes it will be a little soft. As the beef is heavy so does weigh done the pastry.
Q: How do I know if my duxelles is dry enough? A: It should have a paste or tapenade consistency, spreadable but tacky, not wet or runny. If you press it and liquid comes out, keep cooking.
Q: Can I use a different cut of beef? A: Beef fillet (tenderloin) is traditional because it's so tender and cooks quickly. Other cuts are too tough or require longer cooking.
Q: What if I don't have a wire rack for elevated baking? A: Use a slotted pizza tray, or preheat a regular baking tray in the oven for 5 minutes and place your Wellington directly on the hot tray. The key is getting heat underneath.
You Might Also Like
Dauphinoise Pithivier - Another spectacular pastry-wrapped showstopper, this one vegetarian with layers of creamy potatoes.
Restaurant Gravy at Home - The perfect rich sauce to serve alongside your Wellington for extra luxury.
Serve with my crispiest roast potatoes for the full restaurant treatment.
Enjoy!
Del x
The ultimate beef Wellington that's perfectly pink inside every single time. Using a meat thermometer is the secret weapon that guarantees success, cook to 52°C internal temperature, rest for 15 minutes, and you'll have medium rare perfection. This is the Christmas showstopper that will impress everyone at your table, and any home cook can make it!
Join the Dishes with Del community.
Stay in the loop with new recipes, exciting announcements, anything to keep you away from the washing up!
No spam here. Just tasty recipes!

