
Devil's Food Cake with Chocolate Buttercream & Spider Web Design
Devil's Food Cake with Chocolate Buttercream & Spider Web Design
This is hands down the best chocolate cake I have ever made. A wickedly rich, deeply chocolatey Devil's Food Cake that's incredibly moist and fudgy, perfect for any celebration but especially dramatic for Halloween.
Recipe Details:
- Prep Time: 40 minutes
- Cook Time: 35 minutes
- Total Time: 1 hour 35 minutes
- Serves: 10-12
- Difficulty: Medium
- Special Equipment: 2 x 20cm (8-inch) cake tins, piping bag, toothpick or skewer, wire rack
This is my take on a classic Devil's Food Cake, and it's absolutely spectacular. Rich, soft, and full of that signature dark chocolate flavor that makes Devil's Food Cake so special. We're layering it with smooth chocolate buttercream, coating it in glossy chocolate sauce, and finishing it with a spooky spider web pattern made from melted white chocolate that looks incredible but is surprisingly simple to do. The secret to this cake's amazing texture? Adding boiling water to the batter, which creates the most moist, fudgy crumb you've ever tasted. It's dark, dramatic, and stays incredibly moist even five days later. Whether you're making it for Halloween, a birthday, or just because you're craving the ultimate chocolate cake, this one will not disappoint.
Why You'll Love This Recipe
- Incredibly moist: The addition of boiling water creates a thin batter that bakes into the most tender, fudgy cake
- Deep chocolate flavor: Dark cocoa powder and coffee enhance the rich chocolate taste without making it taste like coffee
- Stays fresh: This cake remains moist and delicious for up to 5 days, making it perfect for making ahead
- Impressive presentation: The glossy chocolate coating and spider web design look professional but are easy to achieve
- Perfect for celebrations: Dark, dramatic, and absolutely stunning for Halloween parties or any special occasion
Ingredients
For the Cake:
- 265g all-purpose flour
- 375g caster sugar
- 65g cocoa powder
- 2 tsp baking powder
- 2 tsp bicarbonate of soda
- 1 tsp salt
- ⅔ coffee shot (or ⅔ tsp instant coffee powder mixed with 1½ tbsp boiling water)
- 220g whole milk
- 85g vegetable oil
- 85g unsalted butter, melted and cooled
- 2 large eggs
- 165g boiling water
For the Chocolate Buttercream Filling:
- 113g unsalted butter, softened
- 25g dark baking cocoa, sifted
- 0.75g fine salt (a small pinch)
- 155g powdered sugar
- 45g heavy whipping cream
- 58g dark chocolate chips, melted and cooled
For the Chocolate Sauce (coating):
- 340g dark chocolate, chopped
- 60g unsalted butter
- 20g brown sugar
- 250g heavy cream
For the Spider Web Design:
- 50g white chocolate, melted
- Piping bag
- Toothpick or skewer
Instructions
Make the Cake:
1. Preheat and prepare: Preheat your oven to 170°C fan (340°F/150°C fan). Grease and line two 20cm (8-inch) round cake tins with baking paper, making sure the bottom and sides are well covered.
2. Combine the dry ingredients: In a large mixing bowl, sift together the flour, caster sugar, cocoa powder, baking powder, bicarbonate of soda, and salt. Give it a good stir to ensure everything is evenly distributed.
3. Mix the wet ingredients: In a large jug, combine the coffee (or coffee powder mixture), milk, vegetable oil, melted butter, and eggs. Whisk until smooth and well combined.
4. Combine wet and dry: Pour the wet ingredients into the dry ingredients and mix until just combined. Don't overmix at this stage.
5. Add the boiling water: Carefully stir in the boiling water until fully incorporated. The batter will be quite thin, almost pourable, and this is exactly what you want. This thin consistency is what creates that incredibly moist, fudgy texture.
6. Bake: Divide the batter evenly between the two prepared tins. Bake for 30-35 minutes, or until a skewer inserted into the center comes out clean. If your tins are slightly deeper and not as wide, it may take up to 40 minutes. Check after 30 minutes to avoid overbaking.
7. Cool: Let the cakes cool in the tins for 10 minutes, then carefully turn them out onto a wire rack to cool completely before assembling. This is important - if the cakes are warm when you add the chocolate sauce, it will just slide off.
Make the Chocolate Buttercream Filling:
8. Beat the butter: In a medium bowl, beat the softened butter with an electric mixer until pale and creamy, about 2-3 minutes.
9. Add the sugar: Add the powdered sugar and beat again until light and fluffy.
10. Prepare the chocolate: Melt the dark chocolate chips in the microwave in 20-second bursts, stirring between each burst, until smooth and glossy. Add the heavy cream and stir to combine. If the mixture seizes up slightly, pop it back in the microwave for 10 seconds at a time, stirring between bursts, until it becomes smooth and creamy again.
11. Finish the buttercream: Add the melted chocolate mixture, cocoa powder, and salt to the butter mixture. Beat until fully combined and smooth. Set aside until ready to use.
Make the Chocolate Sauce:
12. Prepare a double boiler: Place the chopped dark chocolate, butter, brown sugar, and heavy cream into a heatproof bowl. Set the bowl over a pot of gently simmering water, making sure the bottom of the bowl doesn't touch the water.
13. Melt and combine: Stir continuously until everything is melted together and the mixture is smooth and glossy.
14. Cool completely: Remove from the heat and pour into a jug. Allow to cool completely at room temperature. The sauce will thicken slightly as it cools to the perfect coating consistency. This step is crucial - you must make this while the cakes are baking so it has time to cool. If the sauce is warm when you pour it over the cake, it will simply run off and won't coat properly.
15. Check consistency: If the sauce becomes too thick to pour smoothly once cooled, warm it in the microwave for 10 seconds at a time, stirring between bursts, until it reaches a pourable consistency. Only do this right before you're ready to decorate.
Assemble and Decorate:
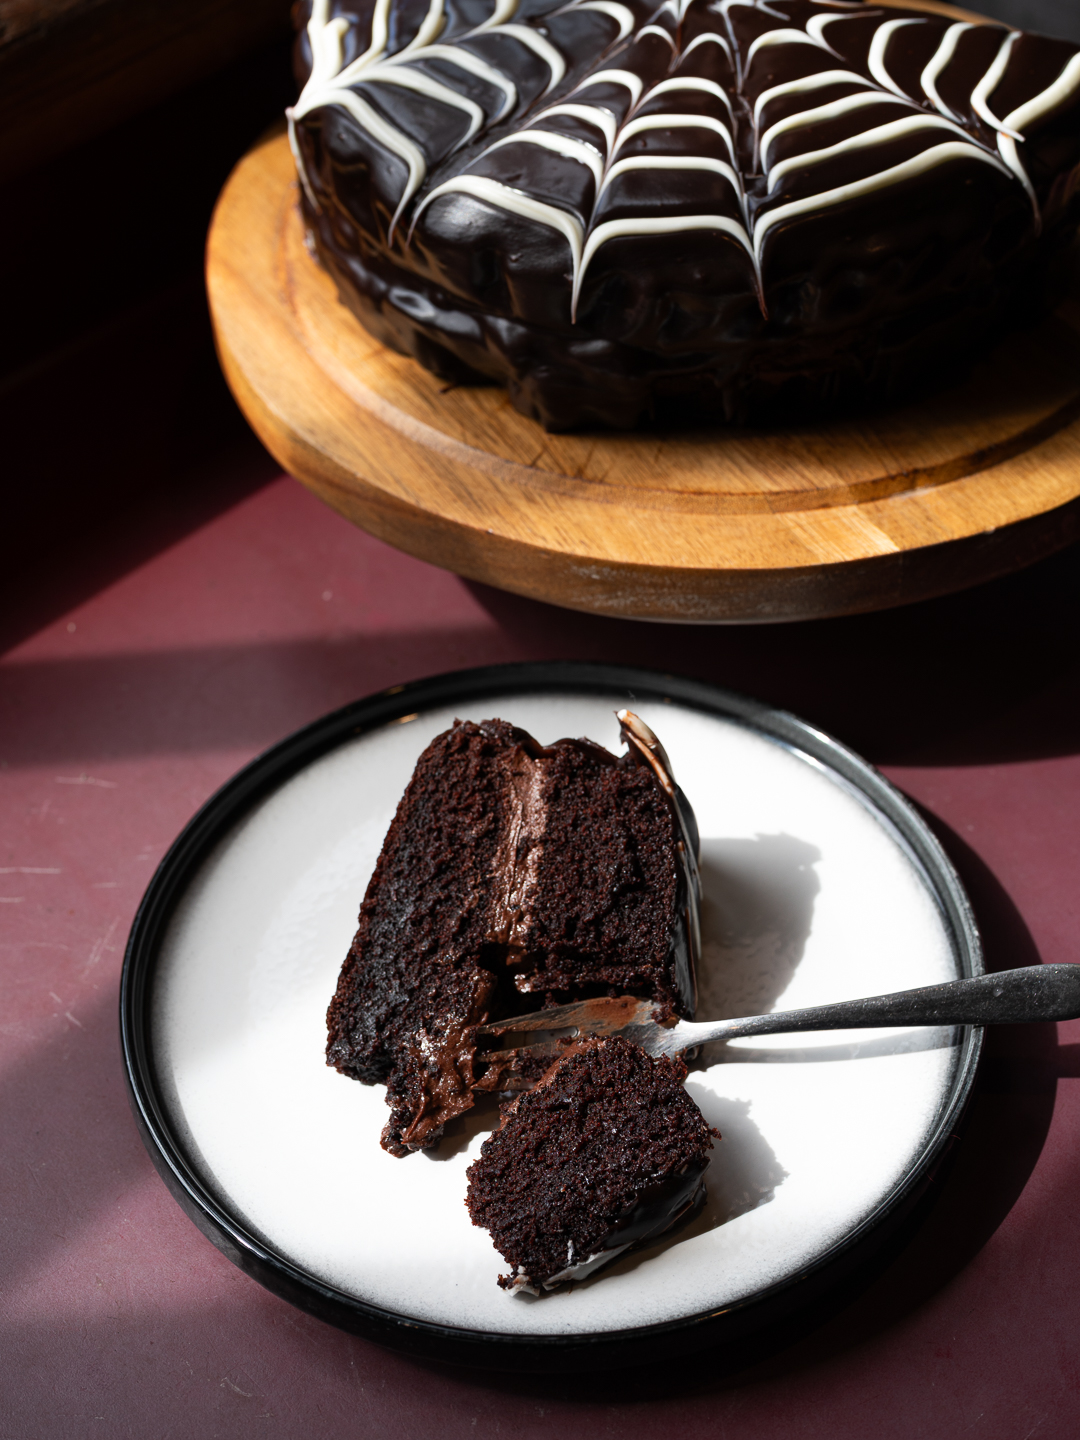
16. Fill the cake: Place one cooled cake layer on your serving plate or cake stand. Spread the chocolate buttercream evenly over the top using a palette knife or offset spatula. Place the second cake layer on top and gently press down to secure.
17. Prepare for coating: Place the filled cake on a wire rack set over a large tray or baking sheet. This will catch the excess chocolate sauce as it drips down.
18. Coat the cake: Pour the cooled chocolate sauce over the top center of the cake, letting it naturally flow over the edges and drip down the sides. Use a palette knife to gently encourage the sauce to cover any bare spots if needed. Let the excess drip into the tray below until the coating looks smooth and even.
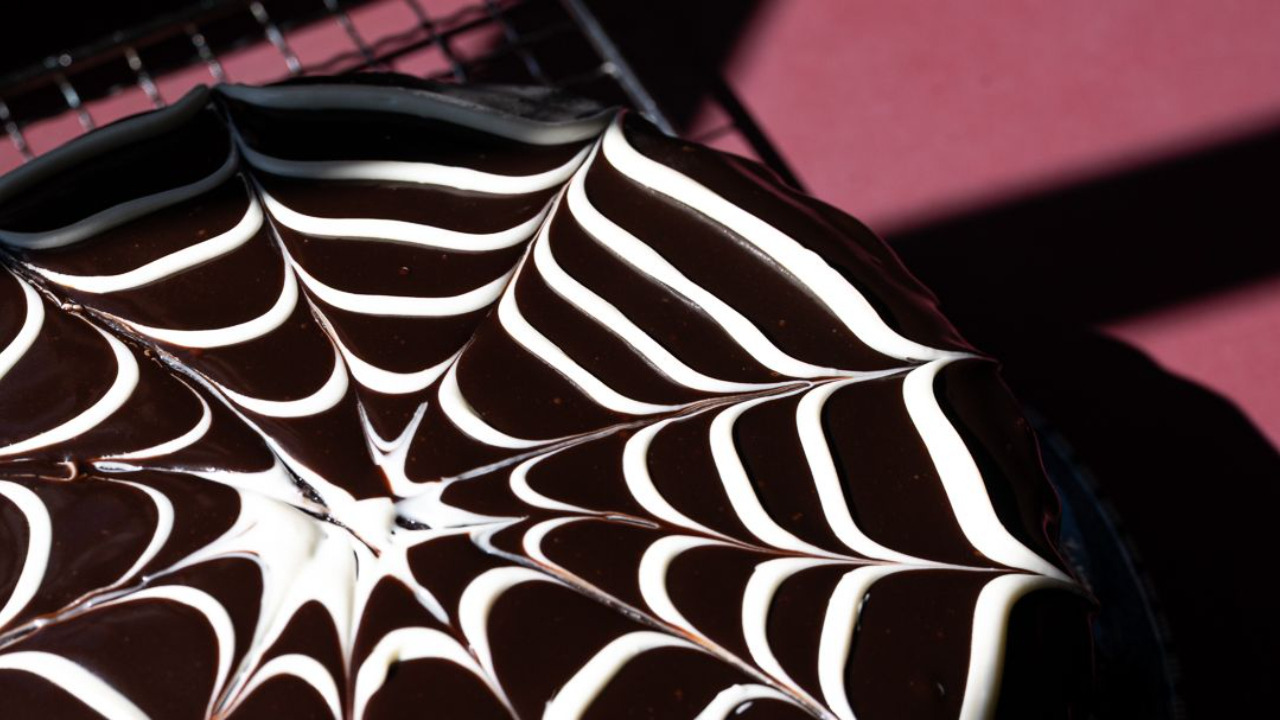
19. Create the spider web design: Melt the white chocolate in the microwave in 20-second bursts until smooth. Spoon it into a small piping bag and snip a tiny hole in the tip. Starting from the center of the cake, pipe concentric circles over the top like a target, spacing them about 2cm apart.
20. Draw the web pattern: Working quickly before the white chocolate sets, take a toothpick or skewer and drag it from the center of the cake outward through the white chocolate circles. Wipe the toothpick clean between each drag. Repeat this pattern all around the cake, spacing the lines evenly, to create a complete spider web effect.
21. Set and serve: Allow the chocolate coating to set completely at room temperature before slicing. This usually takes about 30 minutes to an hour.
Chef's Tips
For the best results: Make sure all your ingredients are at room temperature before starting, especially the eggs and butter. This helps everything incorporate smoothly and creates a better texture.
Coffee enhances chocolate: Don't worry, the coffee won't make your cake taste like coffee. It actually enhances and deepens the chocolate flavor, making it richer and more complex.
Timing is everything: Start making your chocolate sauce coating as soon as you put the cakes in the oven. It needs to be completely cool before you pour it over the assembled cake, otherwise it will be too runny and slide right off.
Spider web tip: Work quickly when creating the spider web design. White chocolate sets fast, so pipe all your circles first, then immediately drag the toothpick through them. If the white chocolate starts to set, you can gently warm the cake with a hairdryer on low heat to soften it slightly.
Extra drama: For an even more impressive presentation, sprinkle a little edible glitter over the web pattern or place a chocolate spider decoration on top before the chocolate sets completely.
Substitutions & Variations
No coffee? You can substitute the coffee with the same amount of hot water. The coffee enhances the chocolate flavor but isn't essential.
Different size tins? If you only have smaller or larger tins, the recipe still works. Just adjust the baking time smaller tins will take less time, larger tins may need a few extra minutes.
Milk chocolate version: Swap the dark chocolate in the buttercream and sauce for milk chocolate if you prefer a sweeter, less intense chocolate flavor.
Non-Halloween decoration: Skip the spider web and simply coat the cake in the glossy chocolate sauce for an elegant look. You could also top it with fresh berries, chocolate shavings, or chocolate curls.
Make it boozy: Add 2 tablespoons of coffee liqueur or Irish cream to the buttercream for an adult version.
Storage & Reheating
Storage: Store the finished cake in an airtight container at room temperature for up to 2 days, or in the refrigerator for up to 5 days. This cake actually stays incredibly moist even after several days, which makes it perfect for making ahead for parties.
Freezer-Friendly: Yes, you can freeze the unfrosted cake layers wrapped tightly in plastic wrap and then foil for up to 3 months. Thaw overnight in the refrigerator before assembling.
Serving temperature: This cake is delicious at room temperature or slightly chilled. If refrigerated, let it sit at room temperature for 20-30 minutes before serving for the best texture and flavor.
Meal Prep: You can bake the cake layers a day in advance and store them wrapped at room temperature. Make the buttercream and chocolate sauce the day before and refrigerate them separately. Bring everything to room temperature before assembling.
Frequently Asked Questions
Q: Why is my chocolate sauce too runny to coat the cake properly? A: The sauce needs to cool completely to thicken to the right coating consistency. If you pour it while it's still warm, it will be too thin and run right off the cake. Make sure to prepare it early and let it cool fully. If it's been cooling for a while and is still too thin, you can refrigerate it for 10-15 minutes, stirring occasionally, until it thickens slightly.
Q: Can I make this cake without the spider web design? A: Absolutely! The spider web is optional and purely decorative. The glossy chocolate coating looks stunning on its own, or you could decorate it with chocolate shavings, fresh berries, or piped buttercream rosettes instead.
Q: My white chocolate seized when creating the web. What happened? A: White chocolate is sensitive to overheating. Make sure to melt it in short 20-second bursts in the microwave, stirring between each burst. If it does seize, try adding a tiny drop of cream or milk and stirring to bring it back together.
Q: Can I use a different type of cocoa powder? A: Yes, you can use regular cocoa powder instead of dark baking cocoa, though the flavor will be slightly less intense. Dutch-process cocoa gives the deepest, darkest color and richest flavor.
Q: How do I know when the cake is done baking? A: Insert a skewer or toothpick into the center of the cake. It should come out clean or with just a few moist crumbs. If there's wet batter on the skewer, bake for another 3-5 minutes and test again. Be careful not to overbake, as this will dry out the cake.
You Might Also Like
Halloween Chocolate Cupcakes - Make these spooky chocolate cupcakes topped with spider web designs for an easier, individual serving version of this cake.
Enjoy!
Del x
Head to my YouTube channel to watch how to make it.
Join the Dishes with Del community.
Stay in the loop with new recipes, exciting announcements, anything to keep you away from the washing up!
No spam here. Just tasty recipes!

